Networks Training

  • About
  • My Books
  • SUGGESTED TRAINING
  • HOME
  • Cisco Networking
    • Cisco General
    • Cisco IOS
    • Cisco VPN
    • Cisco Wireless
  • Cisco ASA
    • Cisco ASA General
    • Cisco ASA Firewall Configuration
  • Certifications Training
    • CCNA Training
    • Cisco Certifications
    • I.T Training
  • General
    • General Networking
    • IP Telephony
    • Network Security
    • Product Reviews
    • Software
  • Cisco Routers
  • Cisco Switches
You are here: Home / Cisco Switches / How to Configure Cisco Router-on-a-stick with Switch

How to Configure Cisco Router-on-a-stick with Switch

Written By Harris Andrea

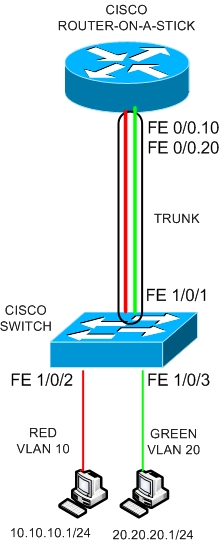
In this post I will explain how to provide routing between two VLANs on a simple Layer 2 switch using a Cisco router with just one interface. This is called also Router-on-a-stick. This configuration is usually asked as a question in CCNA exams, so I hope it will be helpful for people preparing for certification. Lets see the diagram below to get us started:
Cisco router on a stick

A Cisco Layer 2 switch carries two VLANs (VLAN 10 – RED and VLAN 20 – GREEN) with two hosts connected to them as shown on the diagram above. The two ports of the switch with the hosts connected to them (FE1/0/2 and FE1/0/3) must be access ports.

The first host belongs to Network 10.10.10.0/24 (VLAN10) and the second one to 20.20.20.0/24 (VLAN20).

By default, if the switch is just a normal Layer 2 switch the two hosts can not communicate between them because they belong to different VLANs and there is no routing.

Thus, if we want to provide network connectivity between the two VLANs we need to have a Layer 3 engine somewhere in the network.

This can be accomplished either if the switch is Layer 3 (using Layer3 InterVLAN Routing) or if there is a router in place. In our example we use a router to provide Layer 3 connectivity as shown in our diagram.

The router uses just a single interface connected to a trunk port on the switch. The Router interface can be divided into two subinterfaces, with each subinterface belonging to the appropriate VLAN.

The switch port connected to the router must be a trunk port in order to be able to carry both VLANs towards the router port. Lets see the configuration below:

MORE READING:  Traffic Filtering on Cisco Layer3 Switches using ACL and VACL

Table of Contents

  • SWITCH CONFIGURATION
  • ROUTER CONFIGURATION
  • Restricting Traffic Between VLANs
  • Use Cases and Limitations
  • DOWNLOAD THIS TUTORIAL AS PDF FILE
  • Related Posts

SWITCH CONFIGURATION

# conf t
(config)# vlan 10
(config-vlan)# exit
(config)# vlan 20
(config-vlan)# exit

(config)# interface FastEthernet1/0/1
(config-if)# description trunk-to-router-on-a-stick
(config-if)# switchport trunk encapsulation dot1q
(config-if)# switchport mode trunk
(config-if)# spanning-tree portfast trunk
(config-if)# exit

(config)# interface FastEthernet1/0/2
(config-if)# description connection-to-RED-VLAN
(config-if)# switchport mode access
(config-if)# switchport access vlan 10
(config-if)# exit

(config)# interface FastEthernet1/0/3
(config-if)# description connection-to-GREEN-VLAN
(config-if)# switchport mode access
(config-if)# switchport access vlan 20
(config-if)# exit
(config)# exit
# copy run start

NOTE:

The “spanning-tree portfast trunk” command on interface FastEthernet1/0/1 is used to bypass spanning-tree delay when connecting the interface to the router. This command should not be used if the interface is connected to another switch in order to avoid possible spanning-tree loops.

ROUTER CONFIGURATION

# conf t
(config)# interface fastethernet 0/0.10
(config-if)# encapsulation dot1q 10
(config-if)# ip address 10.10.10.2 255.255.255.0
(config-if)# exit
(config)# interface fastethernet 0/0.20
(config-if)# encapsulation dot1q 20
(config-if)# ip address 20.20.20.2 255.255.255.0
(config-if)# exit

Now, in order for the two hosts to communicate between them, they must set as default gateway the IP address of the corresponding router subinterface address (e.g for host in VLAN 10 the gateway must be 10.10.10.2 and for host in VLAN 20 the gateway must be 20.20.20.2).

MORE READING:  Cisco Switch Commands Cheat Sheet (CLI)

Restricting Traffic Between VLANs

If you want to restrict traffic between the two VLANs, you can do so using Access Control Lists applied to the subinterfaces of the router.

For example, if you want to allow only host 10.10.10.10 to communicate with host 20.20.20.10 then you can create the following ACL and apply it to the router as shown below:

# conf t
(config)# access-list 101 permit ip host 10.10.10.10 host 20.20.20.10
(config)# interface fastethernet 0/0.10
(config-if)# ip access-group 101 in
(config-if)# exit

The numbered ACL 101 allows all traffic from host 10.10.10.10 to reach host 20.20.20.10 and denies everything else (note that in ACLs there is an implicit “deny all” at the end of the access-list).

Use Cases and Limitations

The “Router on a Stick” configuration is useful in situations where there is no Layer3 switch available and the only networking equipment you have are a router and a Layer2 switch. With this scenario you can provide Layer3 routing between two or more Layer2 VLANs which exist on the switch.

Note however that all traffic between the VLANs will pass through the single physical interface of the router.

Therefore, if the router is low-end model with not much bandwidth performance and also if the interface is just a simple old 10/100 Mbps interface, then you might have traffic problems (especially if the VLANs have lots of traffic between them).

DOWNLOAD THIS TUTORIAL AS PDF FILE

Related Posts

  • How to Configure a Loopback Interface on Cisco Router & Switch
  • Cisco Switch Layer2 Layer3 Design and Configuration
  • Description of Switchport Mode Access vs Trunk Modes on Cisco Switches
  • What is an SFP Port-Module in Network Switches and Devices
  • 8 Different Types of VLANs in TCP/IP Networks

Filed Under: Cisco Switches

Download Free Cisco Commands Cheat Sheets

Enter your Email below to Download our Free Cisco Commands Cheat Sheets for Routers, Switches and ASA Firewalls.

We use Elastic Email as our marketing automation service. By submitting this form, you agree that the information you provide will be transferred to Elastic Email for processing in accordance with their Terms of Use and Privacy Policy. Also, you allow me to send you informational and marketing emails from time-to-time.

About Harris Andrea

Harris Andrea is an Engineer with more than two decades of professional experience in the fields of TCP/IP Networks, Information Security and I.T. Over the years he has acquired several professional certifications such as CCNA, CCNP, CEH, ECSA etc.

He is a self-published author of two books ("Cisco ASA Firewall Fundamentals" and "Cisco VPN Configuration Guide") which are available at Amazon and on this website as well.

Comments

  1. Blake Darrow says

    September 28, 2009 at 11:26 pm

    Thanks, this is perfect. If only Cisco had published this in their switching book.

  2. reiragna1234 says

    December 4, 2009 at 9:52 pm

    thanks for saving me

    this tutorial really helps me.

  3. javier says

    March 25, 2010 at 4:31 pm

    would this work with a layer 2 dell switch 3524?

  4. BlogAdmin says

    March 26, 2010 at 12:12 pm

    If the switch support Dot1Q trunking then it will work

  5. Arey says

    May 21, 2010 at 3:22 pm

    Great posting, very helpful.

  6. jack says

    July 19, 2010 at 7:00 pm

    Hi,

    I’m new to networks, and I’m trying to configure router-on-a-stick w/ switch using a Cisco Catalyst 2960 switch and C7206 router.

    I tried running through those commands but got stuck with the “switchport trunk encapsulation dot1q” line. I’m guessing the switch doesn’t support “dot1q” like you said earlier.

    Is there an alternative way to still configure router-on-a-stick?

  7. Blog Admin says

    July 23, 2010 at 9:01 am

    You must have some sort of “Vlan tagging” in order to split the single link interface into several vlans.

  8. Warren Sullivan says

    August 25, 2010 at 3:30 am

    Jack,
    You only have to enter the command:
    (config-if)# switchport trunk encapsulation dot1q
    if your switch supports 203.1q AND ISL (ISL is an old school cisco proprietry protocol)
    If the option isnt there, it only supports 203.1q so there is no need to specify 203.1q, just skip the line….as in:
    # conf t
    (config)# vlan database
    (config-vlan)# vlan 10 name RED
    (config-vlan)# vlan 20 name GREEN
    (config-vlan)# exit
    (config)# interface FastEthernet1/0/1
    (config-if)# description trunk-to-router-on-a-stick
    (config-if)# switchport mode trunk
    (config-if)# exit
    (config)# interface FastEthernet1/0/2
    (config-if)# description connection-to-RED-VLAN
    (config-if)# switchport mode access
    (config-if)# switchport access vlan 10
    (config-if)# exit
    (config)# interface FastEthernet1/0/3
    (config-if)# description connection-to-GREEN-VLAN
    (config-if)# switchport mode access
    (config-if)# switchport access vlan 20
    (config-if)# exit
    (config)# exit
    # copy run start

  9. Blog Admin says

    August 25, 2010 at 4:58 am

    Yeap, Warren is right. I haven’t played much with 2960 switches but seems they support only 802.1q as Vlan protocol, so you just need to specify “switchport mode trunk” only in your configuration.

  10. R Bacca says

    October 13, 2010 at 12:18 am

    Hi,
    I just did the router-on-a-stick lab and works well with two PCs as hosts.
    But I couldn’t make work using two routers acting as hosts, as instructed I added the default gateway to the routers but no luck (the only way that I could make it work was by running rip an all 3 routers..But I think I can do it without running rip.. I just don’t know how any help would be appreciated )

    This is the config on the router

    PC2#show run
    Building configuration…
    Current configuration : 819 bytes
    version 12.3
    service timestamps debug datetime msec
    service timestamps log datetime msec
    no service password-encryption
    hostname PC2
    boot-start-marker
    boot-end-marker
    memory-size iomem 15
    no network-clock-participate slot 1
    no network-clock-participate wic 0
    no aaa new-model
    ip subnet-zero
    ip cef
    !no ip domain lookup
    ip audit po max-events 100
    !
    interface FastEthernet0/0
    ip address 172.12.2.2 255.255.255.0
    duplex auto
    speed auto
    !
    router rip
    version 2
    network 172.12.0.0
    !
    ip default-gateway 172.12.2.1
    ip http server
    no ip http secure-server
    ip classless
    line con 0
    line aux 0
    line vty 0 4
    !
    !
    end

  11. Blog Admin says

    October 13, 2010 at 5:22 am

    The default gateway on the router must be assigned as following:

    ip route 0.0.0.0 0.0.0.0 172.12.2.1

    Remove RIP and put the above command and should work.

  12. Sean says

    October 27, 2010 at 3:02 am

    So what about the native vlan on the interface that is trunking to the router? meaning, what if I want the native vlan to be 2 or 3 instead of the default 1?

  13. Blog Admin says

    October 27, 2010 at 4:43 am

    Hi Sean,

    There is command under the interface configuration with which you specify the native vlan. I think the command is “switchport trunk native vlan 2“

  14. Eddie says

    March 30, 2011 at 1:37 am

    Warren, What is 203.1q? Don’t you mean 802.1q? …or am I missing something?

  15. Blog Admin says

    March 30, 2011 at 3:59 pm

    Eddie,

    He means 802.1q….it was a typo

  16. john says

    August 4, 2011 at 2:09 am

    hi, i have 2 doubts:
    1. let’s say there are 3 vlans- vlan 1,2,3. now my trunk link connecting the switch and the router uses dot1q. now on the router i configure 2 sub-interfaces- one using dot1q 2 and the other using dot1q 3. the traffic belonging to vlan 1 will be sent by the switch to the router without any tag. so will the physical interface of the router deal with that untagged frame (and hence will i have to assign an ip to the physical interface of the router) or will i have to create a sub-interface for vlan 1 as well? and if i’ll have to create a subinterface for vlan 1 then what will be my vlan id in the encapsulation dot1q statement cuz that frame would be without any vlan tag.
    doubt 2 : let’s say i configure a sub-interface of a router with the statement – “encap dot1q 2”. now can i configure another statement as – “encap isl 3”? (i know it’s a stupid question but i am still curious to know). any help will be highly appreciated.
    thanks.
    john.

  17. Blog Admin says

    August 8, 2011 at 6:12 am

    John,

    Good questions.

    1) you can put as vlanid 1 and put the keyword “native vlan”
    2) from what I know, you can not have dot1q and isl on the same trunk port. In any case, ISL is not used any more by Cisco.

  18. ken says

    April 17, 2013 at 1:12 am

    I suched alot of blogs,website and youtube. Sofar this one is perfect.
    very straight forward.. Good job my friend.

  19. Shantanu Kannao says

    May 28, 2013 at 1:47 pm

    Hi,

    I liked this blog-spot very much………keep it up…..

    I also have bookmarked it …thanks….

  20. joe says

    January 5, 2014 at 8:56 pm

    I followed your instructions above and cannot get a connection between the L2 switch and router. I used a straight through and cross over cable and still cant. The interface on the switch is trunked and all interfaces are “no shut”. Anyone? Thanks.

  21. joe says

    January 5, 2014 at 9:14 pm

    Never mind I got it. Thanks.

  22. Emeka says

    September 4, 2019 at 1:59 am

    Does the subnet mask of the vlan on the Subinterfaces of the router, need to to match that of the respective vlan on the switch, as in /18 on router Subinterface and /24 on corresponding vlan on switch?

  23. Harris Andrea says

    September 4, 2019 at 4:38 am

    No they don’t have to match (although its a good idea to have consistency).

    However, if there is an IP address outside the range of the other subnet it will not be able to communicate with the other subnet.

Leave a Reply

Your email address will not be published. Required fields are marked *

This site uses Akismet to reduce spam. Learn how your comment data is processed.

Search this site

About Networks Training

We Provide Technical Tutorials and Configuration Examples about TCP/IP Networks with focus on Cisco Products and Technologies. This blog entails my own thoughts and ideas, which may not represent the thoughts of Cisco Systems Inc. This blog is NOT affiliated or endorsed by Cisco Systems Inc. All product names, logos and artwork are copyrights/trademarks of their respective owners.

Amazon Disclosure

As an Amazon Associate I earn from qualifying purchases.
Amazon and the Amazon logo are trademarks of Amazon.com, Inc. or its affiliates.

Search

BLOGROLL

Tech21Century
Firewall.cx

Copyright © 2023 | Privacy Policy | Terms and Conditions | Hire Me | Contact | Amazon Disclaimer | Delivery Policy

210 shares