In this article, we will discuss a couple of core concepts of network switching which are about Access and Trunk ports and how to configure them using “switchport mode access” and “switchport mode trunk” commands on Cisco switches
We will also delve into what a VLAN is, why they’re used and how all of this looks from the perspective of a switch.
With a firm grasp of those switching topics, we will then bring the theory to life with some examples.
Finally, the article will wrap everything up into a neat summary for you to take away in a bite-sized manner.
Switchport Mode Access and Switchport Mode Trunk
The interfaces (ports) of network switches (specifically Cisco switches) can be configured as Access Ports and Trunk Ports. If the switch is Layer 3, then they can also be configured as Layer 3 routed ports as well.
In this article we will examine Access Mode and Trunk Mode ports on Cisco switches.
What is “switchport mode access”
This is the command that configures the port of the switch in Access Mode.
It is used to connect single hosts to the port such as user computers, servers, network printers etc.
If a switch port is operating in “access” mode, it can be assigned to only a single VLAN, adding additional security.
Multiple ports can be assigned to a VLAN, and ports in the same VLAN share the same broadcast domain. Ports in different VLANs do not share a broadcast domain.
Containing broadcasts within a VLAN enhances the overall performance of the network as all devices don’t need to process every broadcast.
Access ports receive un-tagged frames without any VLAN information from hosts.
What is “switchport mode trunk”
This is the command that configures the port of the switch in Trunk Mode.
Trunk ports are used to connect switches together and can carry multiple VLANs between switches.
Trunk ports must receive tagged frames with the VLAN assignment of each frame.
Comparison Table of Switchport Mode Access vs Trunk
| Access Mode Port | Trunk Mode Port |
| In this mode, the port functions as a non-trunking untagged single VLAN Layer 2 interface. | In this mode, the port functions as a trunk allowing multiple VLANs to traverse it using VLAN tags.
|
| Belongs to a single VLAN | A member of all VLANs by default (this can be limited by configuring the allowed-VLAN list) for transport purposes. |
| Used to connect end-point hosts | Used to connect switches together |
| Command: Switchport mode access | Command: Switchport mode trunk |
| Does not carry VLAN tags | The port carries VLAN tags and uses 802.1Q encapsulation |
Configuration Examples
Access Mode
Step 1: Create VLAN
!Connect to CLI of Switch and enable privileged EXEC mode.
Switch>enable
!Enter into configuration mode.
Switch#conf t
!Add VLAN 2 with name Data.
Switch(config)#vlan 2
Switch(config-vlan)#name Data
Switch(config-vlan)#exit
Step 2: Assign Port Fa0/2 to VLAN 2
Switch(config)#interface fa0/2
Switch(config-if)#switchport mode access
Switch(config-if)#switchport access vlan 2
Switch(config-if)#end
Step 3: Verification
Switch#show vlan brief
The above will configure port Fastethernet 0/2 as access port. A computer connected to this port will belong in VLAN 2. If another port is configured as access in VLAN 2, then the hosts connected to these ports will belong to the same VLAN and subnet as well.
Trunk Mode
Step 1: Create VLANs 2,3
!Connect to CLI of Switch and enable privileged EXEC mode.
Switch>enable
!Enter into configuration mode.
Switch#conf t
!Create VLANs 2,3
Switch(config)#vlan 2
Switch(config-vlan)#name IT
Switch(config-vlan)#vlan 3
Switch(config-vlan)#name HR
Switch(config-vlan)#exit
Step 2: Configure Port Fa0/1 as Trunk
Switch(config)#interface fa0/1
Switch(config-if)#switchport mode trunk
Switch(config-if)#end
When you try to configure the switch-port to trunk mode using “switchport mode trunk” command, you might get the error message shown below.
Command rejected: An interface whose trunk encapsulation is “Auto” can not be configured to “trunk” mode.
This depends on the switch model but I’m showing this here to you so that you will be prepared in real-world switches.
In order to avoid the above error, you must first configure the “encapsulation” type of the trunk port.
Remember that Cisco switches support both ISL encapsulation and 802.1Q encapsulation (the preferred one). Let’s configure the encapsulation to 802.1Q.
Switch(config)#interface fa0/1
Switch(config-if)# switchport trunk encapsulation dot1q
Switch(config-if)# switchport mode trunk
Switch(config-if)# end
Switch#wr
Step 3: Verification
Switch#show interfaces trunk
The above commands configured port fa0/1 as trunk port which will be able to transport both created VLANs 2 and 3.
Description of VLAN, Access Port, Trunk Port
VLAN
First things first, what is a VLAN? A Virtual Local Area Network (VLAN) gives an engineer the ability to construct logical groups of network devices.
These devices logically appear as if they are in their own separate network, even if utilizing the same infrastructure as other VLANs.
Each VLAN is its own Layer 2 broadcast domain, this is normally tied to a unique IP subnet. A VLAN can be present on a single switch or stretch via multiple switches.
VLANs can include devices in a single building (Figure 1) or multi-building sites.
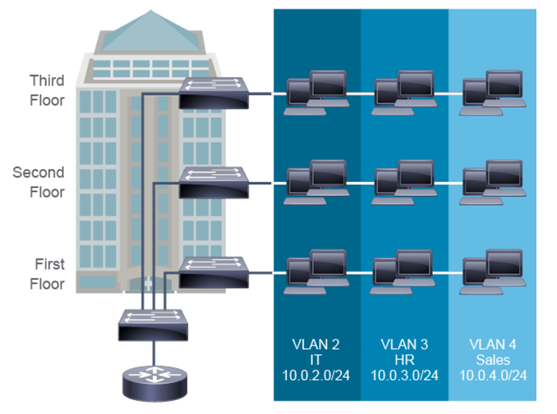
Figure 1 – Typical VLAN Use
The primary job of a VLAN is to provide segmentation between groups of organisational units.
You can design a VLAN structure that lets you associate devices to a function or team regardless of the physical location of the users.
VLANs allow you to implement access and security policies for groups of users.
Access Port
The end device connected to the switch to an access port has no knowledge of a configured VLAN on the switch. The configuration is only performed on the switch port as access mode.
The end device has an IP address and subnet mask that associates it with a subnet. The network engineer maps each subnet to the VLANs that are configured on the switches.
When you connect a host to a switch access port, you should associate the port with a VLAN in accordance with the network design and the subnet that it belongs to.
To associate a device with a VLAN, assign the switch port to which the device connects to a single VLAN.
The switch port, therefore, becomes an access port.
After creating a VLAN, you can manually assign a port or many ports to this VLAN. A port can belong to only one data VLAN at a time.
Out of the box, VLAN 1 is the default VLAN. Without admin intervention, VLAN 1 is assigned automatically to a port.
Trunk Port
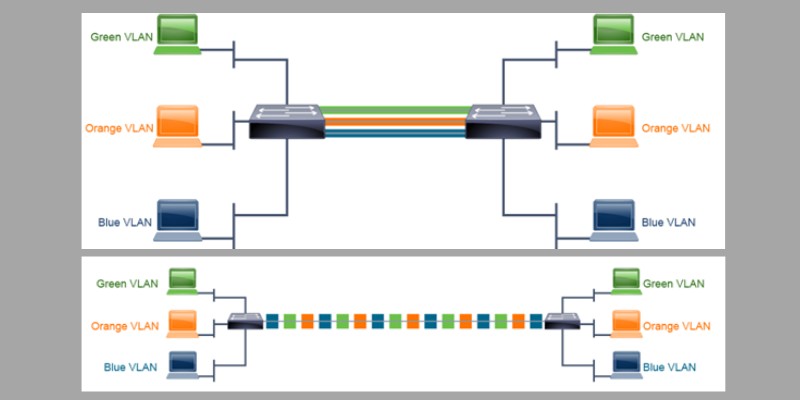
Now let’s expand a little, what happens when our environment contains more than a single switch and we wish to use VLANs across all the switches.
Can a VLAN only exist on a single switch? Fortunately, the answer is no thanks to trunking.
Without trunking, running many VLANs between switches would require the same number of interconnecting links.
In Figure 2, for three VLANs means three physical links between the switches. You can see the scalability issue here without trunking.
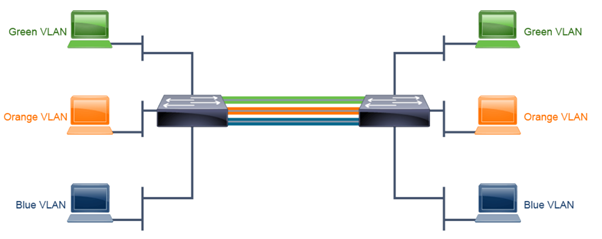
Figure 2 – Connecting switches without trunking
A trunk is a connection between switches that transports the traffic of multiple VLANs over a single link.
A trunk is not tied to a specific VLAN. Instead, it is a pipe for VLANs between devices. The default behaviour of a Cisco Catalyst switch is to carry all configured VLANs over a trunk interface. For security purposes, this can be cut down to only allow certain VLANs.
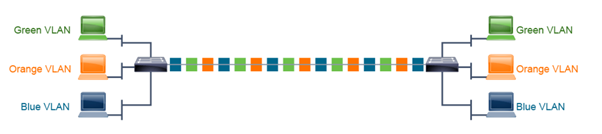
Figure 3 – Connecting switches with trunking
Summary
In short, we’ve explained what a VLAN is, the difference between an access and trunk port and we’ve gone through how they are configured using commands “switchport mode access” and “switchport mode trunk”.
A VLAN is a logical method of segregating broadcast domains. Once a port is assigned to a VLAN, it is part of that broadcast domain.
Multiple ports can be in the same VLAN, a common design is to group devices with a similar function, such as Sales, into a VLAN.
To carry multiple VLANs between switches, a trunk port must be configured on each end.
Related Posts
- What is Cisco Switch Virtual Interface (SVI) – Configuration Example and Explanation
- Deleting the VLAN Database from a Cisco Switch (IOS or Nexus)
- What is Cisco Virtual Port Channel (vPC) – Explained and Discussed
- Discussion and Explanation of BPDU Guard (With Cisco Config Example)
- From Reactive to Proactive: Mastering Network Performance with Switch Monitoring