The following article describes how to configure Access Control Lists (ACL) on Cisco ASA 5500 and 5500-X firewalls. An ACL is the central configuration feature to enforce security rules in your network so it is an important concept to learn.

The Cisco ASA 5500 is the successor Cisco firewall model series which followed the successful Cisco PIX firewall appliance. Currently the newest generation of ASA is 5500-X series but the configuration on ACLs is the same.
Cisco calls the ASA 5500 a “security appliance” instead of just a “hardware firewall”, because the ASA is not just a firewall.
This device combines several security functionalities, such as Intrusion Detection, Intrusion Prevention, Content Inspection, Botnet Inspection, in addition to the firewall functionality.
However, the core ASA functionality is to work as a high performance firewall. All the other security features are just complimentary services on top of the firewall functionality.
Having said that, the purpose of a network firewall is to protect computer and IT resources from malicious sources by blocking and controlling traffic flow. The Cisco ASA firewall achieves this traffic control using Access Control Lists (ACL).
Inbound and Outbound ACLs
An ACL is a list of rules with permit or deny statements. Basically an Access Control List enforces the security policy on the network.
The ACL (list of policy rules) is then applied to a firewall interface, either on the inbound or on the outbound traffic direction.
If the ACL is applied on the inbound traffic direction (in), then the ACL is applied to traffic entering a firewall interface.
The opposite happens for ACL applied to the outbound (out) direction. The “out” ACL is applied to traffic exiting from a firewall interface.
Permit or Deny Statements
The ACL permit or deny statements basically consist of source and destination IP addresses and ports.
A permit ACL statement allows the specified source IP address/network to access the specified destination IP address/network.
The opposite happens for deny ACL statements. At the end of the ACL, the firewall inserts by default an implicit DENY ALL statement rule which is not visible in the configuration.
Enough theory so far. Let us see some examples below to clarify what we have said above.
ASA Access List Examples
The basic command format of the Access Control List is the following:
ciscoasa(config)# access-list “access_list_name” extended {deny | permit} protocol “source_address” “mask” [source_port] “dest_address” “mask” [ dest_port]
To apply the ACL on a specific interface use the access-group command as below:
ciscoasa(config)# access-group “access_list_name” [in|out] interface “interface_name”
Example 1:
Allow only http traffic from inside network 10.0.0.0/24 to outside internet.
ciscoasa(config)# access-list HTTP-ONLY extended permit tcp 10.0.0.0 255.255.255.0 any eq 80
ciscoasa(config)# access-group HTTP-ONLY in interface inside
The name “HTTP-ONLY” is the Access Control List name itself, which in our example contains only one permit rule statement.
Remember that there is an implicit DENY ALL rule at the end of the ACL which is not shown by default, therefore all other traffic will be blocked.
Example 2:
Deny telnet traffic from host 10.1.1.1 to host 10.2.2.2 and allow everything else.
ciscoasa(config)# access-list DENY-TELNET extended deny tcp host 10.1.1.1 host 10.2.2.2 eq 23
ciscoasa(config)# access-list DENY-TELNET extended permit ip host 10.1.1.1 host 10.2.2.2
ciscoasa(config)# access-group DENY-TELNET in interface inside
The above example ACL (DENY-TELNET) contains two rule statements, one deny and one permit. As we mentioned above, the “access-group” command applies the ACL to an interface (either to an inbound or to an outbound direction).
Example 3:
The example below will deny ALL TCP traffic from our internal network 192.168.1.0/24 towards the external network 200.1.1.0/24.
Also, it will deny HTTP traffic (port 80) from our internal network to the external host 210.1.1.1. All other traffic will be permitted from inside.
ciscoasa(config)# access-list INSIDE_IN extended deny tcp 192.168.1.0 255.255.255.0 200.1.1.0 255.255.255.0
ciscoasa(config)# access-list INSIDE_IN extended deny tcp 192.168.1.0 255.255.255.0 host 210.1.1.1 eq 80
ciscoasa(config)# access-list INSIDE_IN extended permit ip any any
ciscoasa(config)# access-group INSIDE_IN in interface inside
Example 4:
Another popular example is an ACL applied to the “outside” interface for allowing HTTP traffic to reach a web server protected by the firewall.
Usually the servers which are publicly accessible from the Internet are placed in a DMZ security zone (not in the internal protected zone).
In the example below, we have a webserver (with IP 50.50.50.1) placed in DMZ zone and we want to allow traffic from Internet (denoted as “any” in the ACL) to reach this server at port 443 (HTTPs).
ciscoasa(config)# access-list OUTSIDE_IN extended permit tcp any host 50.50.50.1 eq 443
ciscoasa(config)# access-group OUTSIDE_IN in interface outside
Although the webserver is placed in a DMZ zone, the access-list is applied to the outside interface of the ASA because this is where the traffic comes in.
NOTE: From ASA version 8.3 and later, the example above must reference the real IP address configured on the Web Server and not the NAT IP. This means that if the Webserver has a private IP configured on its network card (e.g 10.0.0.1) which is NATed to public IP 50.50.50.1, the ACL above must reference the private IP and not the public.
Example 5:
Let’s now see another popular example which uses “object groups” to reference a collection of multiple hosts in an ACL.
Assume we have 4 Web servers in a DMZ zone and we want to allow access to those servers from the Internet. We can create a “network object group” and put all servers inside this logical group. Then we can use this object group in the ACL instead of using each host individually.
! First create the network object group
ciscoasa(config)# object-group network DMZ_SERVERS
ciscoasa(config-network-object-group)# network-object host 192.168.1.10
ciscoasa(config-network-object-group)# network-object host 192.168.1.20
ciscoasa(config-network-object-group)# network-object host 192.168.1.30
ciscoasa(config-network-object-group)# network-object host 192.168.1.40
! Now use the above object in the ACL
ciscoasa(config)# access-list ACCESS_TO_DMZ extended permit tcp any object-group DMZ_SERVERS eq 80
ciscoasa(config)# access-list ACCESS_TO_DMZ extended permit tcp any object-group DMZ_SERVERS eq 443
!Apply the ACL to the outside interface
ciscoasa(config)# access-group ACCESS_TO_DMZ in interface outside
Example 6:
Following from the example above, let’s combine “network object groups” with “service object groups”. The latter, is used to group TCP or UDP port numbers and use it in an ACL.
Assume we have the same “network object group” as above with name “DMZ_SERVERS”. Let’s now create a “service object group” with ports 80 and 443.
! Create the service object group
ciscoasa(config)# object-group service WEB_PORTS tcp
ciscoasa(config-service)# port-object eq http
ciscoasa(config-service)# port-object eq https
! Now use the above objects in the ACL
ciscoasa(config)# access-list ACCESS_TO_DMZ extended permit tcp any object-group DMZ_SERVERS object-group WEB_PORTS
!Apply the ACL to the outside interface
ciscoasa(config)# access-group ACCESS_TO_DMZ in interface outside
The advantage of using object groups (for both network hosts and service ports) is that you can just add or remove entries within the object group without having to change anything on the ACL.
ASA and NAT ACL – Order of Operation
Access Control Lists (ACLs) and Network Address Translation (NAT) are two of the most common features that coexist in the configuration of a Cisco ASA appliance.
For both inbound and outbound access control lists, the IP addresses specified in the ACL depend on the interface where the ACL is applied as discussed before.
These IP addresses must be valid on the specific interface that the ACL is attached, regardless of NAT.
Keep the following statement in mind: An Access Control List takes precedence over NAT. That is, an ACL is evaluated FIRST and then a NAT rule is applied to the packet.
EDIT: The above statement is true for ASA version prior to 8.3. For ASA version after 8.3 see the correct order of operation at the end of this article.
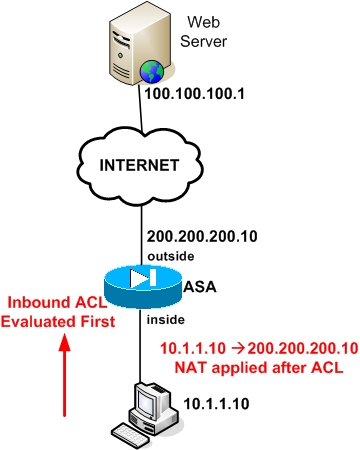
For example, assume an inside host with private address 10.1.1.10 is translated to a public address 200.200.200.10 for outbound traffic (inside to outside) as shown in the diagram below.
An ACL applied to the inside interface of the ASA firewall will first be evaluated to verify if the host 10.1.1.10 can access the Internet (outbound communication) and if the ACL permits this communication, only then NAT will be performed to translate 10.1.1.10 to 200.200.200.10. This is shown in the figure below.

See the following commands for the example above:
!The following ACL is evaluated first
ciscoasa(config)# access-list INSIDE extended permit ip host 10.1.1.10 host 100.100.100.1
ciscoasa(config)# access-group INSIDE in interface inside
!NAT can be applied only if ACL allows the communication
object network inside-subnet
subnet 10.1.1.0 255.255.255.0
nat (inside,outside) dynamic interface
Similarly, a scenario with inbound traffic (outside to inside) works again the same way. That is, an ACL is evaluated first for inbound traffic and then a NAT translation rule is applied
(NOTE: The scenario above for Inbound Traffic is valid only for ASA prior to 8.3. For ASA 8.3 and later, this order is reversed).
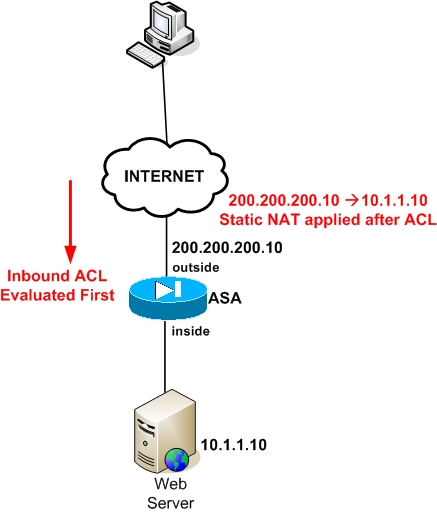
For example, assume we have a Web Server located on the inside network (should be on a DMZ for better security but for the sake of simplicity we assume it is located on the inside network).
The private address configured on the Web Server is 10.1.1.10. We configured also static NAT on the Firewall to map the private address of the Web Server to a public address 200.200.200.10 on the outside (see figure below).
Inbound traffic coming from the Internet towards the public address of the Web Server will first go through an ACL to verify if the traffic is permitted or not. If traffic is allowed by the ACL, then the static NAT will be applied to translate the destination address from 200.200.200.10 to 10.1.1.10.

See the following commands for the example above:
!The following ACL is evaluated first
ciscoasa(config)# access-list OUTSIDE extended permit tcp any host 200.200.200.10 eq 80
ciscoasa(config)# access-group OUTSIDE in interface outside
! Static NAT can be applied only if ACL allows the communication
object network WEB_SERVER
host 10.1.1.10
nat (inside,outside) static 200.200.200.10
UPDATE:
For Cisco ASA version 8.3 and later, the order of operation regarding ACL and NAT is still the same (i.e ACLs are evaluated first and then static NAT takes place) for Outbound traffic (inside to outside).
For Inbound traffic (outside to inside), the ACL now must reference the real private IP of the server and NOT the public IP. Therefore, the correct order of operation for Inbound traffic is NAT first and then ACL.
In our example above, for ASA 8.3 the ACL would look like below:
ciscoasa(config)# access-list OUTSIDE extended permit tcp any host 10.1.1.10 eq 80
Just to summarize all the above:
For ASA version prior to 8.3
Order of operation for outbound traffic:
1) ACL
2) NAT
Order of operation for inbound traffic:
1) ACL
2) NAT
For ASA version after 8.3
Order of operation for outbound traffic:
1) ACL
2) NAT
Order of operation for inbound traffic:
1) NAT
2) ACL
Related Posts
- Prevent Spoofing Attacks on Cisco ASA using RPF
- Configuring Connection Limits on Cisco ASA Firewalls – Protect from DoS
- Configuring AAA Authentication-Authorization-Accounting on Cisco ASA Firewall (TACACS+, RADIUS)
- Cisco ASA Firewall Management Interface Configuration (with Example)
- Cisco ASA Firewall Packet Tracer for Network Troubleshooting