Nowadays enterprises should deploy any available defenses they have available in order to eliminate, or at least minimize, possible attacks in their networks.
Security controls should start from the network itself and span the whole IT infrastructure up to the application level.

In this article I will describe a simple and effective security protection which is already available on all Cisco switches. This is DHCP snooping.
This feature can be enabled and configured on Cisco switches with a few commands and protects your network from attackers who might try to connect a rogue DHCP server to your network in order to assign fake IP addresses and DNS servers to your users.
In this article we will see how this attack works and how to configure DHCP Snooping on Cisco switches to block such attacks.
What is DHCP Snooping
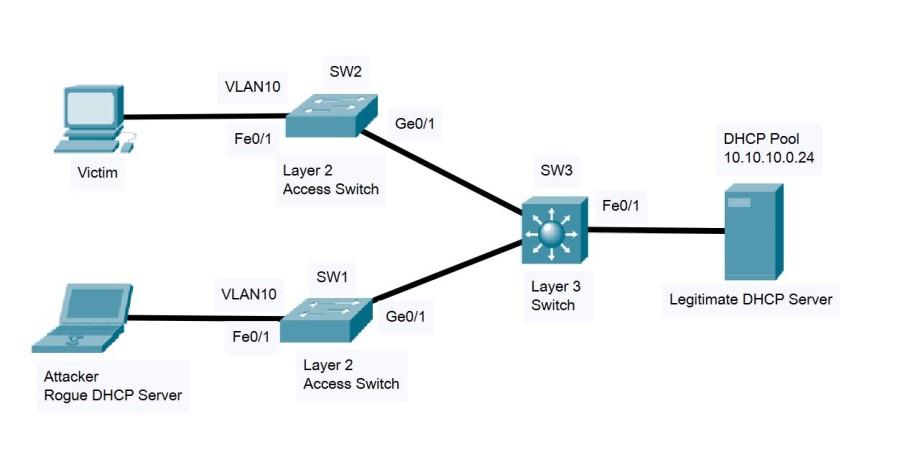
Have a look at the following example network below. We have two Layer 2 Access Switches (SW1, SW2), a core switch (SW3) and a DHCP Server which is the official server installed by the administrator in order to provide IP addresses and other network settings to users (DNS, default gateway etc).
Let’s start first by describing the attack.
An attacker (bottom left in the diagram) connects a Rogue DHCP Server in the same VLAN 10 as the rest of the users. A user’s computer (“Victim” as shown on the top left) is configured to receive network settings from DHCP, thus the computer will send a “DHCP Discover” packet in the network as shown below:
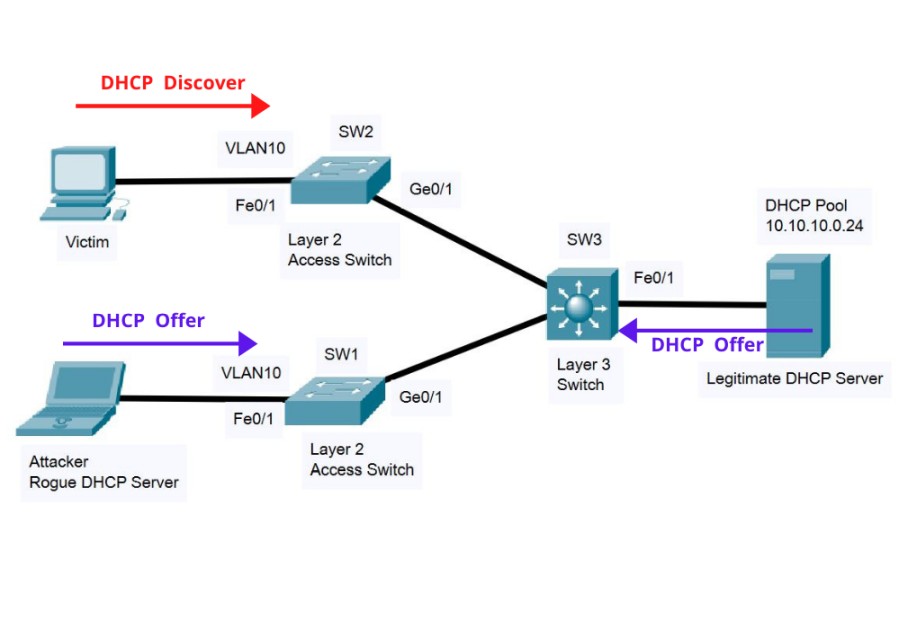
Normally, the “Legitimate DHCP Server” on the right will respond to the request (with a “DHCP Offer” packet) and assign the correct network settings (IP, DNS, Gateway etc) to the client.
However, the Rogue DHCP Server of the attacker will also respond with a “DHCP Offer”. This will create a “race condition” and if the Rogue DHCP Server is a little faster, it will assign fake settings to the user before the legitimate server.
This means that the attacker can assign a fake default gateway and DNS server to the user which will be controlled by the attacker. From there on, the attacker can act as “man in the middle” or send the user to fake websites etc.
With DHCP snooping enabled, the switch will listen for DHCP traffic in the network and will allow only “DHCP Offers” coming from trusted sources. Therefore, the DHCP Offer from the fake Rogue server will be blocked by the switch as shown below:
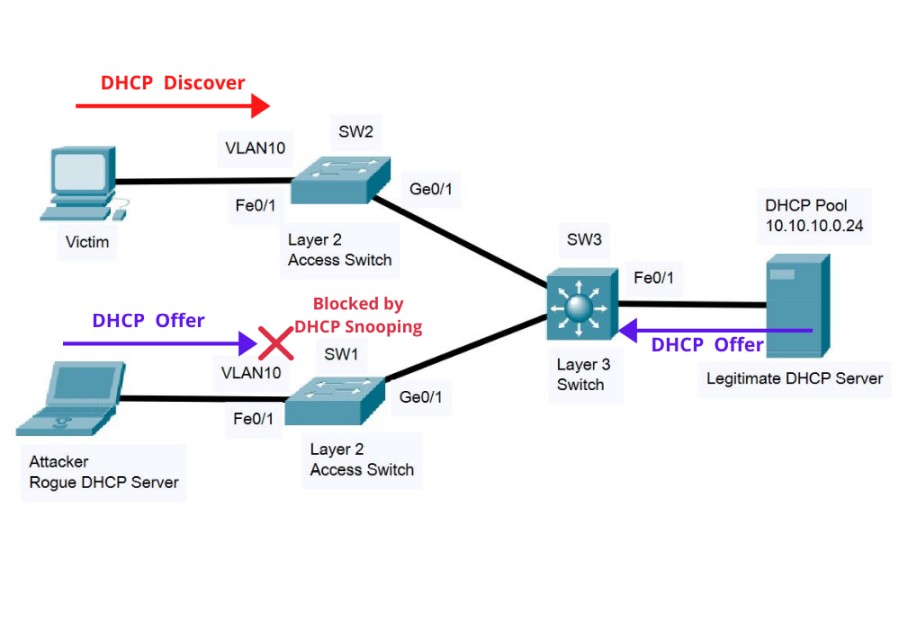
When DHCP Snooping is enabled on all the switches, by default all “DHCP Offer” packets will be blocked unless the switch is explicitly configured to “trust” certain ports which are facing the legitimate DHCP server.
Therefore, only interfaces configured as “trusted” will be allowed to forward “DHCP Offer” packets thus rogue packets will be blocked.
In our example above, the interfaces Ge0/1 of both SW1 and SW2 and also the interface Fe0/1 of SW3 will be configured to trust the “DHCP Offer” packets because these are coming from the Legitimate DHCP server.
How to Configure DHCP Snooping on Cisco Switches
Let’s now see a step-by-step configuration of this feature in our example topology shown above.
The general steps include:
- Enable DHCP Snooping globally on every switch.
- Enable the snooping feature on the specific VLAN you want to protect (e.g VLAN 10 in our example above).
- For better compatibility, disable the insertion of DHCP option 82 from the switch.
- Go to all switches and find the interfaces facing the legitimate DHCP server. These interfaces will receive legitimate DHCP Offer packets and must be configured as “trusted”. All other interfaces by default will block any DHCP Offer packets.
- Optional: You can place a limit on DHCP client requests (packets per second) so that to avoid an attacker from sending too many DHCP requests and thus deplete the resources of the server.
Let’s start with the configuration:
Step 1: Enable DHCP Snooping Globally
SW1(config)#ip dhcp snooping
SW2(config)#ip dhcp snooping
SW3(config)#ip dhcp snooping
Step 2: Enable DHCP Snooping on VLAN 10
SW1(config)#ip dhcp snooping vlan 10
SW2(config)#ip dhcp snooping vlan 10
SW3(config)#ip dhcp snooping vlan 10
Step 3: Disable the insertion of option 82 in the DHCP packets
SW1(config)#no ip dhcp snooping information option
SW2(config)#no ip dhcp snooping information option
SW3(config)#no ip dhcp snooping information option
NOTE: The above configuration will disable the switch from inserting option 82 in the DHCP packets. This will offer better compatibility with DHCP servers because some servers drop packets with option 82.
Step 4: Configure the trusted interfaces on switches (the ones facing the Legitimate DHCP Server)
SW1(config)# interface GigabitEthernet0/1
SW1(config-if)# ip dhcp snooping trust
SW2(config)# interface GigabitEthernet0/1
SW2(config-if)# ip dhcp snooping trust
SW3(config)# interface FastEthernet0/1
SW3(config-if)# ip dhcp snooping trust
Step 5 (Optional): Configure rate limit on DHCP requests from clients
SW1(config)# interface FastEthernet0/1
SW1(config-if)# ip dhcp snooping limit rate 20
SW2(config)# interface FastEthernet0/1
SW2(config-if)# ip dhcp snooping limit rate 20
Step 6: Verification
SW1#show ip dhcp snooping
Switch DHCP snooping is enabled
DHCP snooping is configured on following VLANs:
10
Insertion of option 82 is disabled
Option 82 on untrusted port is not allowed
Verification of hwaddr field is enabled
Interface Trusted Rate limit (pps)
———————– ——- —————-
GigabitEthernet0/1 yes unlimited
FastEthernet0/1 no 20
SW2#show ip dhcp snooping
Switch DHCP snooping is enabled
DHCP snooping is configured on following VLANs:
10
Insertion of option 82 is disabled
Option 82 on untrusted port is not allowed
Verification of hwaddr field is enabled
Interface Trusted Rate limit (pps)
———————– ——- —————-
GigabitEthernet0/1 yes unlimited
FastEthernet0/1 no 20
SW3#show ip dhcp snooping
Switch DHCP snooping is enabled
DHCP snooping is configured on following VLANs:
10
Insertion of option 82 is disabled
circuit-id default format: vlan-mod-port
remote-id: 0001.9641.6CBE (MAC)
Option 82 on untrusted port is not allowed
Verification of hwaddr field is enabled
Verification of giaddr field is enabled
DHCP snooping trust/rate is configured on the following Interfaces:
Interface Trusted Allow option Rate limit (pps)
———————– ——- ———— —————-
FastEthernet0/1 yes yes unlimited
All Configurations
Switch 1
SW1#show run
hostname SW1
!
ip dhcp snooping vlan 10
no ip dhcp snooping information option
ip dhcp snooping
!
interface FastEthernet0/1
switchport access vlan 10
ip dhcp snooping limit rate 20
switchport mode access
!
[output omitted]
!
interface GigabitEthernet0/1
ip dhcp snooping trust
switchport mode trunk
!
Switch 2
SW2#show run
hostname SW2
!
ip dhcp snooping vlan 10
no ip dhcp snooping information option
ip dhcp snooping
!
spanning-tree mode pvst
spanning-tree extend system-id
!
interface FastEthernet0/1
switchport access vlan 10
ip dhcp snooping limit rate 20
switchport mode access
!
[output omitted]
!
interface GigabitEthernet0/1
ip dhcp snooping trust
switchport mode trunk
!
Switch 3
SW3# show run
!
ip dhcp snooping vlan 10
no ip dhcp snooping information option
ip dhcp snooping
!
interface FastEthernet0/1
ip dhcp snooping trust
switchport access vlan 10
switchport mode access
interface GigabitEthernet0/1
switchport trunk encapsulation dot1q
switchport mode trunk
!
interface GigabitEthernet0/2
switchport trunk encapsulation dot1q
switchport mode trunk
Related Posts
- What is Cisco Switch Virtual Interface (SVI) – Configuration Example and Explanation
- Deleting the VLAN Database from a Cisco Switch (IOS or Nexus)
- What is Cisco Virtual Port Channel (vPC) – Explained and Discussed
- Discussion and Explanation of BPDU Guard (With Cisco Config Example)
- From Reactive to Proactive: Mastering Network Performance with Switch Monitoring