Networks Training

  • About
  • My Books
  • SUGGESTED TRAINING
  • HOME
  • Cisco Networking
    • Cisco General
    • Cisco IOS
    • Cisco VPN
    • Cisco Wireless
  • Cisco ASA
    • Cisco ASA General
    • Cisco ASA Firewall Configuration
  • Certifications Training
    • CCNA Training
    • Cisco Certifications
    • I.T Training
  • General
    • General Networking
    • IP Telephony
    • Network Security
    • Product Reviews
    • Software
  • Cisco Routers
  • Cisco Switches
You are here: Home / Cisco VPN / Site-to-Site IPSEC VPN Between Two Cisco ASA – one with Dynamic IP

Site-to-Site IPSEC VPN Between Two Cisco ASA – one with Dynamic IP

Written By Harris Andrea

Cisco ASA 5500 Series appliances deliver IPsec and SSL VPN, firewall, and several other networking services on a single platform. Cisco ASA 5520, a member of the Cisco ASA 5500 Series, is shown in Figure 1 below.

asa5520 picture

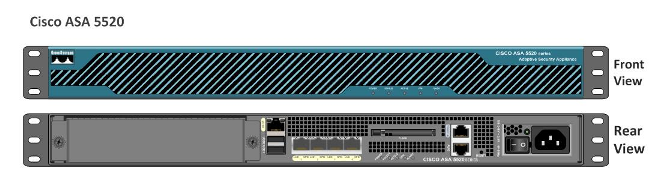
Figure 1 Cisco Adaptive Security Appliance (ASA)

In this article, we will focus on site-to-site IPsec implementation between two Cisco ASA 5520 appliances, as shown in Figure 2. The outside interface of ASA1 is assigned a dynamic IP address by the service provider over DHCP, while the outside interface of ASA2 is configured with a static IP address. Basic IP address configuration and connectivity exists and we will build IPsec configuration on top of this. Although this tutorial was tested on ASA5520, the configuration commands are exactly the same for the other ASA models with no difference.

cisco asa site to site ipsec vpn

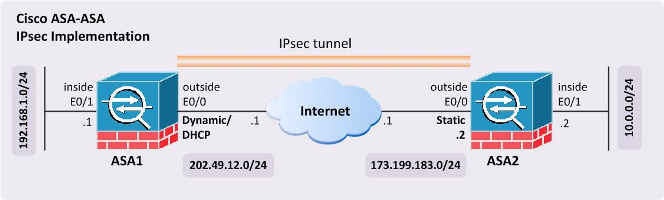
Figure 2  Cisco ASA-ASA IPsec Implementation

IP Security (IPsec) can use Internet Key Exchange (IKE) for key management and tunnel negotiation. IKE involves a combination of ISAKMP/Phase 1 and IPsec/Phase 2 attributes that are negotiated between peers. If any one of the attributes is misconfigured, the IPsec tunnel fails to establish. Therefore, it is mandatory to make sure that all these parameters are identical on the two appliances we are using as IPsec peers.

We will start with a preconfiguration checklist to make our life easier. This checklist would serve as a reference for configuration and troubleshooting.

Table 1   Configuration Checklist: ISAKMP/Phase-1 Attributes

Attribute Value
Encryption AES 128-bit
Hashing SHA-1
Authentication method Preshared keys
DH group Group 2 1024-bit field
Lifetime 86,400 seconds

After discussing Phase 1 attributes, it is important to highlight Phase 2 attributes of the IPsec VPN connection, that are used to encrypt and decrypt the actual data traffic.

Table 2   Configuration Checklist: IPsec/Phase-2 Attributes

Attribute Value
Encryption AES 128-bit
Hashing SHA-1
Lifetime 28,800 seconds4,608,000 kB
Mode Tunnel
PFS group None

Now that we have determined what Phase 1 and Phase 2 attributes to use, we’re ready to configure the site-to-site IPsec tunnel between ASA1 and ASA2.

Let’s start with configuring ASA1:

! ISAKMP Phase 1

crypto ikev1 policy 10
authentication pre-share
encryption aes
hash sha
group 2
lifetime 86400

!
crypto ikev1 enable outside
tunnel-group 173.199.183.2 type ipsec-l2l
tunnel-group 173.199.183.2 ipsec-attributes
ikev1 pre-shared-key Cisc0

MORE READING:  VPN Config Generator-Software to create Cisco VPN Configurations

! IPsec Phase 2

access-list RED permit ip 192.168.1.0 255.255.255.0 10.0.0.0 255.255.255.0
crypto ipsec ikev1 transform-set ESP-AES128-SHA esp-aes esp-sha-hmac
crypto map VPN-MAP 10 match address RED
crypto map VPN-MAP 10 set peer 173.199.183.2
crypto map VPN-MAP 10 set ikev1 transform-set ESP-AES128-SHA
crypto map VPN-MAP interface outside

Here goes the configuration for ASA2:

! Create ISAKMP policy

crypto ikev1 policy 10
authentication pre-share
encryption aes
hash sha
group 2
lifetime 86400
crypto ikev1 enable outside

! Define the pre-shared key within the dynamic map tunnel group

tunnel-group DefaultL2LGroup ipsec-attributes
ikev1 pre-shared-key Cisc0
!
crypto ipsec ikev1 transform-set ESP-AES128-SHA esp-aes esp-sha-hmac

access-list BLUE permit ip 10.0.0.0 255.255.255.0 192.168.1.0 255.255.255.0

! Create a dynamic-map

crypto dynamic-map DYN-MAP 20 match address BLUE (OPTIONAL)
crypto dynamic-map DYN-MAP 20 set ikev1 transform-set ESP-AES128-SHA

! Assign the dynamic-map to crypto map

crypto map VPN-MAP 10 ipsec-isakmp dynamic DYN-MAP
crypto map VPN-MAP interface outside

The above commands conclude the IPSEC VPN configuration. However, if we have NAT in our network (which is true most of the times), we still have some way to go. We must configure NAT exemption for VPN traffic. That is, traffic that will pass through the VPN tunnel (i.e traffic between the LAN networks 192.168.1.0/24 10.0.0.0/24) must be excluded from NAT operation.

Configure NAT Exemption on ASA1

ASA1(config)# object network obj-local
ASA1(config-network-object)# subnet 192.168.1.0 255.255.255.0
ASA1(config-network-object)# exit

ASA1(config)# object network obj-remote
ASA1(config-network-object)# subnet 10.0.0.0 255.255.255.0
ASA1(config-network-object)# exit

ASA1(config)# object network internal-lan
ASA1(config-network-object)# subnet 192.168.1.0 255.255.255.0
ASA1(config-network-object)# exit

! Exclude traffic from LAN1 to LAN2 from NAT operation

ASA1(config)# nat (inside,outside) source static obj-local obj-local destination static obj-remote obj-remote

! Configure Port Address Translation (PAT) using the outside ASA interface. This will perform dynamic NAT on internal LAN hosts so that they can access the Internet.

ASA1(config)# object network internal-lan
ASA1(config-network-object)# nat (inside,outside) dynamic interface

Configure NAT Exemption on ASA2

ASA2(config)# object network obj-local
ASA2(config-network-object)# subnet 10.0.0.0 255.255.255.0
ASA2(config-network-object)# exit

ASA2(config)# object network obj-remote
ASA2(config-network-object)# subnet 192.168.1.0 255.255.255.0
ASA2(config-network-object)# exit

ASA2(config)# object network internal-lan
ASA2(config-network-object)# subnet 10.0.0.0 255.255.255.0
ASA2(config-network-object)# exit

MORE READING:  Cisco IPsec Tunnel vs Transport Mode with Example Config

! Exclude traffic from LAN2 to LAN1 from NAT operation

ASA2(config)# nat (inside,outside) source static obj-local obj-local destination static obj-remote obj-remote

! Configure Port Address Translation (PAT) using the outside ASA interface. This will perform dynamic NAT on internal LAN hosts so that they can access the Internet.

ASA2(config)# object network internal-lan
ASA2(config-network-object)# nat (inside,outside) dynamic interface

At this point our IPsec configuration is complete. We can generate some traffic from a host in subnet 192.168.1.0/24 connected to ASA1 to a host in subnet 10.0.0.0/24 connected to ASA2. An easy way to generate such traffic is the good old ping utility. If ping is successful between the two subnets, an IPsec tunnel is also likely to have established successfully. The same can be verified using command show crypto ipsec stats:

ASA1# show crypto ipsec stats

IPsec Global Statistics
———————–
Active tunnels: 1
Previous tunnels: 1
Inbound
Bytes: 400
Decompressed bytes: 400
Packets: 4
Dropped packets: 0
Replay failures: 0
Authentications: 4
Authentication failures: 0
Decryptions: 4
Decryption failures: 0
Decapsulated fragments needing reassembly: 0

Outbound
Bytes: 400
Uncompressed bytes: 400
Packets: 4
Dropped packets: 0
Authentications: 4
Authentication failures: 0
Encryptions: 4
Encryption failures: 0
Fragmentation successes: 0
Pre-fragmentation successses: 0
Post-fragmentation successes: 0
Fragmentation failures: 0
Pre-fragmentation failures: 0
Post-fragmentation failures: 0
Fragments created: 0
PMTUs sent: 0
PMTUs rcvd: 0
Protocol failures: 0
Missing SA failures: 0
System capacity failures: 0

You can get your hands dirty with several other show crypto commands available to verify configuration and view statistics. For example, show crypto isakmp sa detail command can be used to verify ISAKMP/Phase 1 attributes, while show crypto ipsec sa command can be used to verify IPsec/Phase 2 attributes. We have shown here the output for show crypto isakmp sa detail command:

ASA1# show crypto isakmp sa detail

Active SA: 1
Rekey SA: 0 (A tunnel will report 1 Active and 1 Rekey SA during rekey)
Total IKE SA: 1

1   IKE Peer: 173.199.183.2

Type    : L2L             Role    : initiator
Rekey   : no              State   : MM_ACTIVE
Encrypt : aes             Hash    : SHA
Auth    : preshared       Lifetime: 86400
Lifetime Remaining: 85998

If you want to learn how to configure any Cisco VPN scenario on both ASA and Cisco Routers, check out this Cisco VPN eBook here.

Related Posts

  • VPN Failover with HSRP High Availability (Crypto Map Redundancy)
  • Cisco IPsec Tunnel vs Transport Mode with Example Config
  • Cisco DMVPN Configuration Example
  • Site to Site IPSEC VPN Between Cisco Router and Juniper Security Gateway
  • Site-to-Site IPSEC VPN Between Cisco ASA and pfSense

Filed Under: Cisco VPN

Download Free Cisco Commands Cheat Sheets

Enter your Email below to Download our Free Cisco Commands Cheat Sheets for Routers, Switches and ASA Firewalls.

We use Elastic Email as our marketing automation service. By submitting this form, you agree that the information you provide will be transferred to Elastic Email for processing in accordance with their Terms of Use and Privacy Policy. Also, you allow me to send you informational and marketing emails from time-to-time.

About Harris Andrea

Harris Andrea is an Engineer with more than two decades of professional experience in the fields of TCP/IP Networks, Information Security and I.T. Over the years he has acquired several professional certifications such as CCNA, CCNP, CEH, ECSA etc.

He is a self-published author of two books ("Cisco ASA Firewall Fundamentals" and "Cisco VPN Configuration Guide") which are available at Amazon and on this website as well.

Comments

  1. LTLnetworker says

    February 24, 2013 at 9:05 pm

    The line

    crypto dynamic-map DYN-MAP 20 match address BLUE

    is not necessary. In fact, if it’s not omitted, you lose the possibility to have multiple spokes to connect with different local subnets.

  2. Blog Admin says

    February 25, 2013 at 6:34 am

    I both agree and disagree with you :)

    You can omit the ACL (BLUE) from the dynamic map as you suggest. However, if you have only a simple site-to-site topology or a small number of spokes, by using an ACL in the Dynamic MAP you will enhance security a little bit. This is because spokes can connect to the Hub only if they have the correct internal IP addresses as specified by the ACLs in the crypto maps. This is an additional security measure from the “pre-shared-key” password.

    I don’t know if you agree or not. Please let me know your comments as well.

  3. LTLnetworker says

    February 25, 2013 at 9:38 pm

    I haven’t tested it but I guess you can have only one crypto ACL in a dynamic map and you have no option to connect more than one spoke if that line stays there. (Since you can’t presume the peer addresses and assign which ACL would belong to which peer.)

  4. tom says

    May 29, 2014 at 8:32 am

    Hi,

    One question, how did you “make” the 2 Inside interfaces (192.168.1.0 255.255.255.0 10.0.0.0 255.255.255.0) connect to each other?

    Just by mapping the ip’s in the access-lists RED and BLUE?

    Thank you
    Tom

  5. BlogAdmin says

    May 29, 2014 at 2:14 pm

    Tom,
    The RED and BLUE access lists are used to select the “Interesting Traffic” which is going to be placed in the VPN tunnel. The two local networks can communicate with each other over the VPN tunnel. Basically with IPSEC each packet is encapsulated within extra IP headers. Each private IP packet contains both the private IP headers and also the public IP headers and then sent over the internet.

  6. Khem says

    August 28, 2015 at 5:23 am

    Hi,

    I have a scenario.
    Site A(ASA) which is having a site 2 site VPN with Site B(third party firewall).
    Now, I want to established one more VPN lets say site C with Site A(ASA) with different IP address in Site A(ASA).
    Is it possible to have multiple site to site VPN with different IP addressess from Main Hub location?

    Khe

  7. Harris Andrea says

    August 28, 2015 at 5:34 am

    Hi Khem,
    When you say different IP address on SiteA what do you mean exactly? Different public WAN IP address or different internal IP address on SiteA ?

    Whatever the answer to the above is, you can do it with no problem. You can create multiple site-2-site VPN tunnels on the main Hub location.

    Harris

  8. Khem says

    August 28, 2015 at 5:44 am

    Hi Harris,

    Yes, different WAN ip addresses for different site2site location at main hub site A(ASA)

    Already, there is a site to site VPN with ip address lets say WAN IP1 —————–Site A(ASA) WAN IP1—Site B(3rd party firewall)
    Now i want to establish one more site to site VPN with site C. ———Site A(ASA) WAN IP2—–Site C(3rd party firewall).

    I hope above description will help you to understand the topology which i am trying to acheive.

    Regards,
    Khem

  9. Harris Andrea says

    August 28, 2015 at 7:51 am

    Yes the above can be done with a different WAN IP. However, it is not necessary to use a different WAN IP. You can terminate the second VPN tunnel from Site-C to the same WAN IP as the first VPN tunnel with Site-B. Is there a specific reason why you want to use a different WAN IP for the second VPN?

  10. Khem says

    August 28, 2015 at 7:59 am

    Hello Harris,

    Thank you for the reply.
    It was a client requirement, nothing can be done.
    If it is possible can you share the configuration details as we have already used the outside ip address of Site A.
    Then how we will change the WAN Ip address for the second S2S,
    When we create tunnel , we simply enable outside interface but for diffrent WAN IP address how to proceed.

    Regards,
    Khem

  11. Harris Andrea says

    August 28, 2015 at 10:28 am

    You will have to create a new WAN interface on ASA (lets call it “outside2” which will have the new WAN IP) and create new VPN crypto map and apply that to the new “outside2” interface.
    Also, you will need to configure the appropriate NAT statements and ACLs for the new VPN traffic. Basically you will duplicate whatever you have done for the first VPN tunnel.

    Regarding the new WAN IP, it means you will get a new ISP connection for this one?

  12. Gavin says

    February 2, 2023 at 8:40 pm

    Thanks.

    I have setup like this, but isp provides lease on same IP.
    When lease is due asa unable to get IP and have to remove config and reapply.
    I have set to basic work open policy’s, but get no Ip unless remove map from interface.

    Any help please?

  13. Harris Andrea says

    February 3, 2023 at 7:17 am

    If the IP provided by ISP is public, it’t not possible to be the same IP. What kind of connection is this? Is it an internet connection or a private connection between two sites?

Leave a Reply

Your email address will not be published. Required fields are marked *

This site uses Akismet to reduce spam. Learn how your comment data is processed.

Search this site

About Networks Training

We Provide Technical Tutorials and Configuration Examples about TCP/IP Networks with focus on Cisco Products and Technologies. This blog entails my own thoughts and ideas, which may not represent the thoughts of Cisco Systems Inc. This blog is NOT affiliated or endorsed by Cisco Systems Inc. All product names, logos and artwork are copyrights/trademarks of their respective owners.

Amazon Disclosure

As an Amazon Associate I earn from qualifying purchases.
Amazon and the Amazon logo are trademarks of Amazon.com, Inc. or its affiliates.

Search

BLOGROLL

Tech21Century
Firewall.cx

Copyright © 2023 | Privacy Policy | Terms and Conditions | Hire Me | Contact | Amazon Disclaimer | Delivery Policy

0 shares