Cisco IOS Routers support both static and dynamic routes. In small networks (2 to 5 routers) I would suggest to configure only static routes, especially if the network is not going to change much over time.
Of course dynamic routing (using dynamic routing protocols such as RIP, OSPF, EIGRP) is much more flexible and scalable (for larger networks) but gets a little bit tricky to troubleshoot in case of problems.
There is also the option to mix static and dynamic routing if needed, but you need to take into consideration issues such as route redistribution (you will usually need to redistribute static routes into the dynamic protocol).
In this post I will try to illustrate static routing using a small network scenario (see picture below) and explain also some other issues related with ICMP Redirects and Cisco ASA firewall.

Network Description
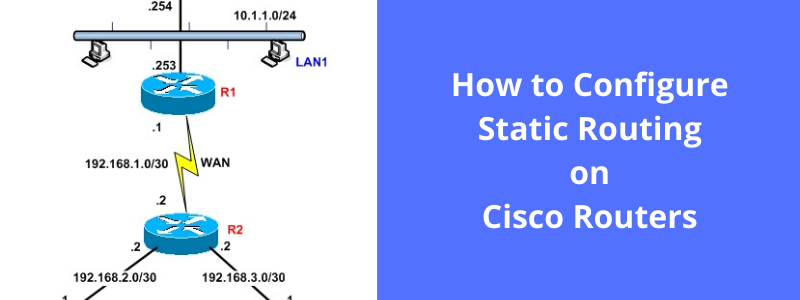
From the example network above, we have a Cisco ASA firewall (ASA1) protecting our internal networks from the Internet.
LAN1 is a Class C network subnet (10.1.1.0/24) which has user computers connected (this might be the headquarters LAN of the Enterprise).
There is also a Router (R1) serving as a WAN router to connect a distant remote office over a WAN link.
At the other side of the WAN link we have R2 which serves as the Hub router having two spokes (R3, R4). There are also two more LAN networks with user computers (LAN2 connected to R3 and LAN3 connected to R4).
The IP addresses assigned to the network are as following:
ASA1 Internal IP: 10.1.1.254
R1 IP on LAN1 network: 10.1.1.253
R1 IP on the WAN link: 192.168.1.1
R2 IP on the WAN link: 192.168.1.2
R2 IP connected with R3: 192.168.2.2
R2 IP connected with R4: 192.168.3.2
R3 IP connected with R2: 192.168.2.1
R3 IP on LAN2 network: 10.2.1.254
R4 IP connected with R2: 192.168.3.1
R4 IP on LAN3 network: 10.2.2.254
LAN1 network: 10.1.1.0/24
LAN2 network: 10.2.1.0/24
LAN3 network: 10.2.2.0/24
Traffic Flow Requirements
We need to have the following communication between networks:
- LAN1 computers need to access the Internet through the ASA and also must be able to communicate with users and servers on LAN2 and LAN3.
- LAN1 users should be able to communicate also with “transit subnets” for troubleshooting and management purposes (“transit subnets” are the point-to-point networks connecting routers between them). These “transit subnets” are 192.168.1.0/30, 192.168.2.0/30, 192.168.3.0/30.
- LAN2 and LAN3 computers need to access the Internet through the ASA and also must be able to communicate with LAN1 network.
Configuration of Static Routing
The intention of this article is to explain static routing only, so I will not get into the full configuration details of all devices in the network. I will just show snippets of commands for static routes.
The general format of a static route command on a Cisco router is:
Router(config)# ip route [destination network] [mask] [gateway address]
The command above tells the router the following information: “if you want to send a packet to the following “destination network”, then send it to this “gateway address”.
The format of a static route command on a Cisco ASA firewall is:
ASA(config)# route [interface name] [destination network] [mask] [gateway]
Now let’s see the commands needed for each router. It’s more convenient to start from the bottom up:
Router R3:
R3(config)# ip route 0.0.0.0 0.0.0.0 192.168.2.2
We just need a default route on this router to send ALL traffic towards R2 gateway address (192.168.2.2).
Router R4:
R4(config)# ip route 0.0.0.0 0.0.0.0 192.168.3.2
Similar with R3, we just need a default route on this router to send ALL traffic towards R2 gateway address (192.168.3.2).
Router R2:
! Default route
R2(config)# ip route 0.0.0.0 0.0.0.0 192.168.1.1
! Static routes to reach LAN2 and LAN3
R2(config)# ip route 10.2.1.0 255.255.255.0 192.168.2.1
R2(config)# ip route 10.2.2.0 255.255.255.0 192.168.3.1
This is a little tricky. We need both a default route (to send all upwards traffic, including traffic to the Internet, towards R1) and also we need two specific static routes to reach LAN2 and LAN3 network. The two specific static routes (two last lines) are needed for the reply packets from LAN2 and LAN3 and also for LAN1 to be able to reach LAN2/LAN3.
Router R1:
! Default Route towards ASA for Internet Traffic
R1(config)# ip route 0.0.0.0 0.0.0.0 10.1.1.254
! Static routes to reach LAN2 and LAN3
R1(config)# ip route 10.2.1.0 255.255.255.0 192.168.1.2
R1(config)# ip route 10.2.2.0 255.255.255.0 192.168.1.2
! Static routes to reach transit point-to-point networks
R1(config)# ip route 192.168.2.0 255.255.255.252 192.168.1.2
R1(config)# ip route 192.168.3.0 255.255.255.252 192.168.1.2
Firewall ASA1:
ASA1(config)# route outside 0.0.0.0 0.0.0.0 [asa gateway IP]
! Static routes to reach LAN2 and LAN3
ASA1(config)# route inside 10.2.1.0 255.255.255.0 10.1.1.253
ASA1(config)# route inside 10.2.2.0 255.255.255.0 10.1.1.253
The ASA will need a default route towards its default gateway IP (assigned by the ISP), and also two static routes to reach the distant LAN2 and LAN3 networks. You DO NOT need a static route for LAN1 network because it is directly connected to the ASA.
Default Gateway for LAN1 computers
As we said before, one of the traffic flow requirements was to access LAN2 and LAN3 networks from LAN1 computers.
If I ask you what should be the default gateway address configured on LAN1 computers, most of you would answer “The ASA internal address 10.1.1.254”. However, this is WRONG. Let me explain why.
Assume you configure the default gateway address for LAN1 hosts to be the ASA address 10.1.1.254. If HostA on LAN1 wants to send traffic to the Internet, then it will send it to its default gateway address (ASA firewall) which will forward the packet to the Internet. So far so good.
However, if HostA wants to send traffic to LAN2 or LAN3 hosts, it will again send the traffic to the ASA which is supposed to send an ICMP Redirect to HostA and tell him “hey, you should really be using 10.1.1.253 to get to LAN2 or LAN3”.
However, the Cisco ASA is NOT ABLE to send an ICMP Redirect like it should. Therefore, HostA will never be able to communicate with LAN2/LAN3. If the ASA was a router instead, everything would work fine because routers actually are able to send ICMP Redirects.
So, the correct answer is to configure all hosts on LAN1 network to have Default Gateway address the IP of R1 (10.1.1.253). This way, they will be able to access both the Internet and the other internal LAN networks (LAN2/LAN3).
IP route statements seem simple enough, but the details regarding the next-hop IP address, the local exit interface, default static routes, and the syntax of the command are vital for success on CCNA exams and in the real world.
For any questions or comments please fill out the comment form below.
Related Posts
- Redistribution and OSFP – Discussion With Cisco Commands Examples
- EIGRP Variance and Unequal Cost Load Balancing in Networking
- Comparison of Reported Distance vs Feasible Distance in EIGRP
- Explanation and Comparison of OSPF E1 vs E2 Routes
- Discussion and Explanation of OSPF Graceful Restart and Shutdown