Networks Training

  • About
  • My Books
  • IP Tools
  • HOME
  • Cisco Networking
    • Cisco General
    • Cisco IOS
    • Cisco VPN
    • Cisco Wireless
  • Cisco ASA
    • Cisco ASA General
    • Cisco ASA Firewall Configuration
  • Certifications Training
    • CCNA Training
    • Cisco Certifications
    • I.T Training
  • General
    • Tech News
    • General Networking
    • IP Telephony
    • Network Security
    • Product Reviews
    • Software
  • Cisco Routers
  • Cisco Switches
You are here: Home / Cisco ASA Firewall Configuration / Cisco ASA Firewall in Transparent Layer2 Mode

Cisco ASA Firewall in Transparent Layer2 Mode

Edited By Harris Andrea

Traditionally, a network firewall is a routed hop that acts as a default gateway for hosts that connect to one of its screened subnets. A transparent firewall (or Layer 2 firewall), on the other hand, acts like a “stealth firewall” and is not seen as a Layer 3 hop to connected devices.
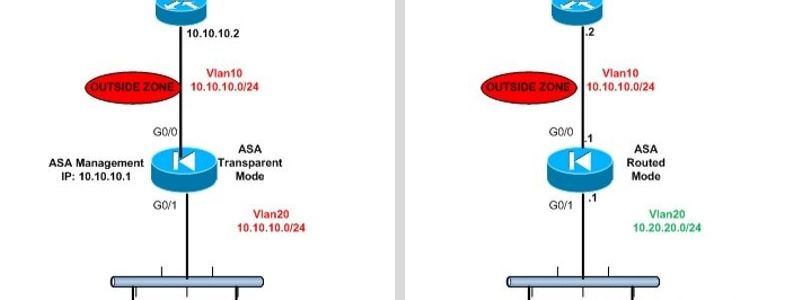
The appliance connects the same Layer 3 network subnet on its inside and outside ports, but each interface of the firewall resides in a different Layer 2 Vlan. The Cisco ASA firewall can operate both in Routed Firewall Mode (default mode) or in Transparent Firewall Mode.

Table of Contents

Toggle
  • Routed Firewall Mode:
  • Transparent Firewall Mode:
  • Characteristics of Transparent Mode
  • Initial Configuration
    • Related Posts

Routed Firewall Mode:

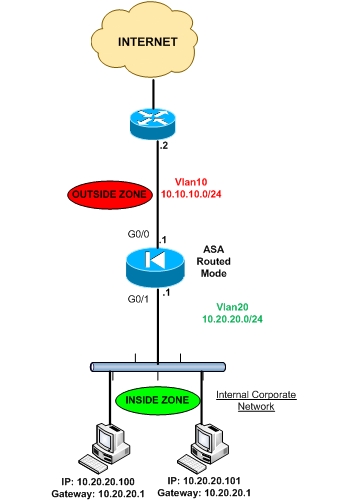
See the diagram below for a common network topology of a Cisco ASA firewall working in Routed Mode.
cisco asa routed mode

As you can see, there are two different network subnets. Inside network (10.20.20.0/24) and Outside Network (10.10.10.0/24).

There must be also two different layer2 vlans (Vlan20 for inside network and Vlan10 for outside network). All hosts residing in internal network must belong to subnet 10.20.20.0 and must have default gateway the internal IP of the ASA (10.20.20.1).

MORE READING:  New Cisco ASA 5506-5508 models with FirePOWER

Transparent Firewall Mode:

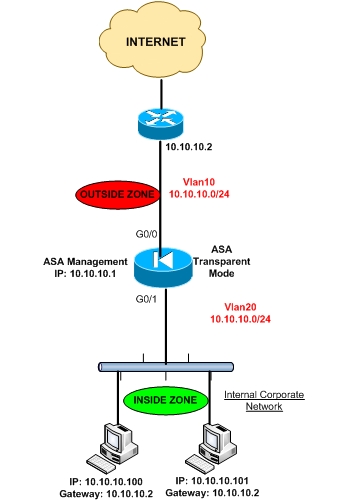
The diagram below shows an example topology using a Cisco ASA in Layer 2 transparent mode.
asa transparent

As you can see, there is only one Layer 3 network (10.10.10.0/24) BUT there MUST be two different Layer 2 Vlans (Vlan20 for inside zone and Vlan10 for outside zone).

All hosts must reside in network range 10.10.10.0 and the devices must have as default gateway the IP address of the outside router (10.10.10.2).

Also, a management IP address MUST be configured on the ASA firewall (again within the range of 10.10.10.0). DO NOT specify the management IP address of the ASA as the default gateway for connected devices.

Characteristics of Transparent Mode

• Transparent firewall mode supports only two interfaces (inside and outside)
• The firewall bridges packets from one VLAN to the other instead of routing them.
• MAC lookups are performed instead of routing table lookups.
• Can run in single firewall context or in multiple firewall contexts.
• A management IP address is required on the ASA.
• The management IP address must be in the same subnet as the connected network.
• Each interface of the ASA must be a different VLAN interface.
• Even though the appliance acts as a Layer 2 bridge, Layer 3 traffic cannot pass through the security appliance from a lower security level to a higher security level interface.
• The firewall can allow any traffic through by using normal extended Access Control Lists (ACL).

MORE READING:  Cisco ASA as DHCP Server with Multiple Internal LANs (Configuration)

Initial Configuration

Asa(config)# firewall transparent

!Configure management IP below
Asa(config)# ip address 10.10.10.1 255.255.255.0

Asa(config)# interface Ethernet0/0
Asa(config-if)# nameif outside
Asa(config-if)# security-level 0
!
Asa(config)# interface Ethernet0/1
Asa(config-if)# nameif inside
Asa(config-if)# security-level 100

Spread the love

Related Posts

  • Prevent Spoofing Attacks on Cisco ASA using RPF
  • Configuring Connection Limits on Cisco ASA Firewalls – Protect from DoS
  • Configuring AAA Authentication-Authorization-Accounting on Cisco ASA Firewall (TACACS+, RADIUS)
  • Cisco ASA Firewall Management Interface Configuration (with Example)
  • How to Configure Access Control Lists on a Cisco ASA 5500/5500-X Firewall (with Examples)

Filed Under: Cisco ASA Firewall Configuration

Download Free Cisco Commands Cheat Sheets

Enter your Email below to Download our Free Cisco Commands Cheat Sheets for Routers, Switches and ASA Firewalls.

By subscribing to our email list you will be receiving technical tutorials and industry news from time-to-time. You can unsubscribe at any time.

About Harris Andrea

Harris Andrea is an Engineer with more than two decades of professional experience in the fields of TCP/IP Networks, Information Security and I.T. Over the years he has acquired several professional certifications such as CCNA, CCNP, CEH, ECSA etc.

He is a self-published author of two books ("Cisco ASA Firewall Fundamentals" and "Cisco VPN Configuration Guide") which are available at Amazon and on this website as well.

Comments

  1. Elijah Maseno says

    October 3, 2019 at 8:01 am

    Hi! I am trying to configure my firewall in transparent mode. The topology is almost the same as one above but only that I don’t have a router in my LAN but only a switch. The challenge is that I extend my subnet to a range of 192.168.50.0 to 192.168.51.0 but am receiving internet only on 192.168.50.0. The question is how do I configure the inside route withoute the default gateway as I don’t have a router inside. Thank you.

  2. Harris Andrea says

    October 3, 2019 at 5:15 pm

    You must have a Layer 3 device in the network in order to have two different subnets. I suggest to put the ASA in routed mode instead of transparent.

  3. Elijah Maseno says

    October 7, 2019 at 3:56 pm

    Thank you Harris for your suggestion, Kindly clarify on how this will help on my scenario.

  4. Harris Andrea says

    October 7, 2019 at 4:11 pm

    If you put the ASA in routed mode, you will be able to create two Layer3 subnets. The ASA will work as the default gateway for each subnets. You will need to create two different security zones on the ASA to accommodate the two subnets

  5. Elijah Maseno says

    October 8, 2019 at 1:57 pm

    thank you for your support, I appriciate. With the above explaination it means I have to change my internal IP address. Though I have tried but still am not able riceive packets when ping the default route. Below is my configuration, with 10.10.10.0 subnet am able to reach the default gate but with 172.168.50.0 am unable to ping the default gate way.
    My network is as follows

    Router-ASA 5506x-switch-pc

    asa(config-if)# show running-config
    : Saved

    :
    : Serial Number: 9ATSMJHGGQX
    : Hardware: ASAv, 2048 MB RAM, CPU Pentium II 2494 MHz
    :
    ASA Version 9.7(1)
    !
    hostname ciscoasa
    enable password $sha512$5000$WHfco/7bIo+mKrr8tJJMZg==$M9crvFLjG1lLzLF3ytOwUA== pbkdf2
    names

    !
    interface GigabitEthernet0/0
    nameif outside
    security-level 0
    ip address 192.168.50.2 255.255.254.0
    !
    interface GigabitEthernet0/1
    nameif inside
    security-level 100
    ip address 10.10.10.10 255.255.0.0
    !
    interface GigabitEthernet0/2
    nameif inside1
    security-level 50
    ip address 172.168.50.1 255.255.0.0
    !
    interface GigabitEthernet0/3
    shutdown
    no nameif
    no security-level
    no ip address
    !
    interface GigabitEthernet0/4
    shutdown
    no nameif
    no security-level
    no ip address
    !
    interface GigabitEthernet0/5
    shutdown
    no nameif
    no security-level
    no ip address
    !
    interface GigabitEthernet0/6
    shutdown
    no nameif
    no security-level
    no ip address
    !
    interface Management0/0
    management-only
    shutdown
    no nameif
    no security-level
    no ip address
    !
    ftp mode passive
    object network inside
    subnet 0.0.0.0 0.0.0.0
    access-list outside extended permit icmp any any echo
    pager lines 23
    mtu outside 1500
    mtu inside 1500
    mtu inside1 1500
    no failover
    no monitor-interface service-module
    icmp unreachable rate-limit 1 burst-size 1
    no asdm history enable
    arp timeout 14400
    no arp permit-nonconnected
    arp rate-limit 8192
    !
    object network inside
    nat (inside,outside) dynamic interface
    route outside 0.0.0.0 0.0.0.0 192.168.50.1 1
    timeout xlate 3:00:00
    timeout pat-xlate 0:00:30
    timeout conn 1:00:00 half-closed 0:10:00 udp 0:02:00 sctp 0:02:00 icmp 0:00:02
    timeout sunrpc 0:10:00 h323 0:05:00 h225 1:00:00 mgcp 0:05:00 mgcp-pat 0:05:00
    timeout sip 0:30:00 sip_media 0:02:00 sip-invite 0:03:00 sip-disconnect 0:02:00
    timeout sip-provisional-media 0:02:00 uauth 0:05:00 absolute
    timeout tcp-proxy-reassembly 0:01:00
    timeout floating-conn 0:00:00
    timeout conn-holddown 0:00:15
    timeout igp stale-route 0:01:10
    user-identity default-domain LOCAL
    no snmp-server location
    no snmp-server contact
    crypto ipsec security-association pmtu-aging infinite
    crypto ca trustpoint _SmartCallHome_ServerCA
    no validation-usage
    crl configure
    crypto ca trustpool policy
    auto-import
    crypto ca certificate chain _SmartCallHome_ServerCA
    certificate ca 18dad19e267de8bb4a2158cdcc6b3b4a

    telnet timeout 5
    ssh stricthostkeycheck
    ssh timeout 5
    ssh key-exchange group dh-group1-sha
    console timeout 0
    threat-detection basic-threat
    threat-detection statistics access-list
    no threat-detection statistics tcp-intercept
    dynamic-access-policy-record DfltAccessPolicy
    !
    class-map inspection_default
    match default-inspection-traffic
    !
    !
    policy-map type inspect dns preset_dns_map
    parameters
    message-length maximum client auto
    message-length maximum 512
    no tcp-inspection
    policy-map global-policy
    class inspection_default
    inspect pptp
    policy-map global_policy
    class inspection_default
    inspect dns preset_dns_map
    inspect ftp
    inspect h323 h225
    inspect h323 ras
    inspect rsh
    inspect rtsp
    inspect esmtp
    inspect sqlnet
    inspect skinny
    inspect sunrpc
    inspect xdmcp
    inspect sip
    inspect netbios
    inspect tftp
    inspect ip-options
    inspect icmp
    inspect icmp error
    !
    service-policy global_policy global
    prompt hostname context
    no call-home reporting anonymous
    call-home
    profile CiscoTAC-1
    no active
    destination address http https://tools.cisco.com/its/service/oddce/services/DDCEService
    destination address email [email protected]
    destination transport-method http
    subscribe-to-alert-group diagnostic
    subscribe-to-alert-group environment
    subscribe-to-alert-group inventory periodic monthly
    subscribe-to-alert-group configuration periodic monthly
    subscribe-to-alert-group telemetry periodic daily
    profile License
    destination address http https://tools.cisco.com/its/service/oddce/services/DDCEService
    destination transport-method http
    Cryptochecksum:e91b33b7ab24ef84be0a7d152aa100b9
    : end
    ciscoasa(config-if)#

  6. Harris Andrea says

    October 8, 2019 at 3:21 pm

    How do you connect your computer to ASA? The ASA interface GihEth0/2 must be in the same vlan as your computer in order to ping its IP address.

  7. Elijah Maseno says

    October 9, 2019 at 4:49 am

    Thank you for the inputs. I have managed to resolve the issues.

Leave a Reply

Your email address will not be published. Required fields are marked *

This site uses Akismet to reduce spam. Learn how your comment data is processed.

Search this site

About Networks Training

We Provide Technical Tutorials and Configuration Examples about TCP/IP Networks with focus on Cisco Products and Technologies. This blog entails my own thoughts and ideas, which may not represent the thoughts of Cisco Systems Inc. This blog is NOT affiliated or endorsed by Cisco Systems Inc. All product names, logos and artwork are copyrights/trademarks of their respective owners.

Amazon Disclosure

As an Amazon Associate I earn from qualifying purchases.
Amazon and the Amazon logo are trademarks of Amazon.com, Inc. or its affiliates.

Search

BLOGROLL

Tech21Century
Firewall.cx

Copyright © 2026 | Privacy Policy | Terms and Conditions | Contact | Amazon Disclaimer | Delivery Policy