IOS Packet Capture
Finally there is a feature that was missing from IOS in the past. This is the ability to easily capture packets travelling through the router, and export the captured data to PCAP format so that you can view it with third party tools (like Wireshark).
This feature is useful also when doing network bench marking to assess how the network behaves under high stress with traffic spikes etc. This can be tested using packet generator software tools for example.
The packets can also be viewed locally on the router. The configuration example below shows how to enable packet capture (supported in IOS version 12.4(20)T):
Cisco-Router# monitor capture buffer mycapturedata size 128 max-size 128 circular
Cisco-Router# monitor capture point ip cef capturepoint1fastEthernet 1/1 both
Cisco-Router# monitor cap point associate capturepoint1 mycapturedata
!Start the capture
Cisco-Router# monitor capture point start capturepoint1
!Stop the capture
Cisco-Router# monitor capture point stop capturepoint1
The configuration above first creates a capture circular buffer (mycapturedata) and a capture interface point (capturepoint1) on physical interface FastEthernet 1/1. Then you need to associate the capture point and the capture buffer.
Now, in order to view or export the captured data use the following commands:
Cisco-Router# show monitor capture buffer mycapturedata dump
Cisco-Router# monitor capture buffer mycapturedata export [location]
IOS Auto Upgrade
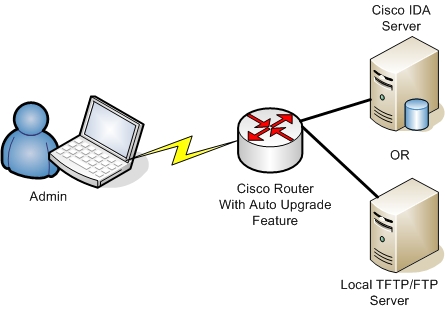
From IOS version 12.4(15)T, there is a new feature for automaticaly upgrading your Cisco IOS images either directly from Cisco (IDA Server – Intelligent Download Application) or from a local TFTP/FTP server, as shown below:

The new auto upgrade feature provides also a “warm upgrade” option which decompresses the new image and transfers control to it using the reload warm command. To set up auto upgrade, use the following commands:
Router# configure terminal
Router(config)# autoupgrade disk-cleanup crashinfo
Router(config)# autoupgrade ida url [enter the URL of the IDA Server]
Router(config)# autoupgrade status [email address] [smtp-server]
! Now issue the interactive mode command to step you through the upgrade process
Router# upgrade automatic
Related Posts
- EIGRP Variance and Unequal Cost Load Balancing in Networking
- Comparison of Reported Distance vs Feasible Distance in EIGRP
- Explanation and Comparison of OSPF E1 vs E2 Routes
- Discussion and Explanation of OSPF Graceful Restart and Shutdown
- Explanation and Configuration of OSPF MD5 Authentication on Cisco Networks