All Cisco ASA firewall models from 5510 and higher (including the newer generation of 5500-X appliances), include an extra dedicated Ethernet interface for management.
In this article we will provide a basic example of configuring network settings to the dedicated management interface and also SSH access in order to connect to the appliance through the network.
In our example we will use a 5506-X ASA model but the same configuration applies to any other model.
Management Interface Configuration
Depending on the ASA model, the management interface port numbering is different (regarding the slot/port notation).
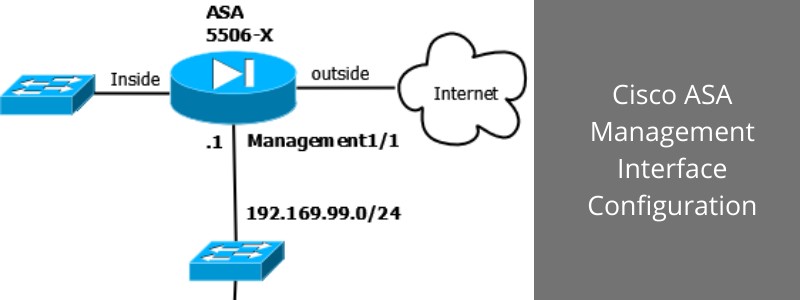
On the ASA 5506-X the management interface is shown as Management1/1.
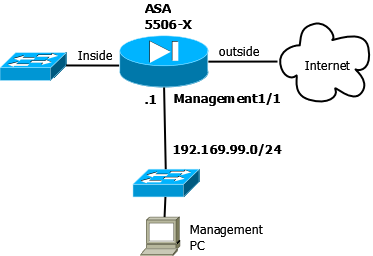
The simple diagram below illustrates a Cisco ASA appliance with “inside”, “outside” and “management” interfaces.
Let’s see how to configure the management:
ASA(config)# interface Management 1/1
ASA(config-if)# nameif MGT
ASA(config-if)# security-level 100
ASA(config-if)# ip address 192.168.99.1 255.255.255.0
ASA(config-if)# management-only
ASA(config-if)# exit
The above is all you need to configure the basic network settings and security level of the management interface. Below we will see also how to configure network access using SSH.
By default, this specific interface is set to management-only mode, which means that it can receive traffic only, but it does not allow traffic to pass through to other interfaces.
In order to enable the Management 1/1 interface to act as a normal Firewall interface, use the following configuration:
ASA(config)# interface Management 1/1
ASA(config-if)# no management-only
With the above, you just added one more normal firewall interface to your appliance since the management interface can now pass traffic through to other interfaces just like any other physical or logical interface.
Configure SSH for Management Access
In order to access the firewall appliance over the network and connect to it for Command Line Interface (CLI) access, the most secure way is to configure SSH. This is preferred over Telnet access which is not encrypted and therefore not secure.
! first create SSH keys and save them
ASA(config)# crypto key generate rsa modulus 4096
ASA(config)# write memory
! create local administrator account
ASA(config)# username asa_admin password strongpass privilege 15
! Enable local authentication for SSH access:
ASA(config)# aaa authentication ssh console LOCAL
! Identify the IP addresses and interface (MGT) from which the ASA accepts SSH connections
ASA(config)# ssh 192.168.99.0 255.255.255.0 MGT
Now you can securely access the ASA appliance from the management network only (192.168.99.0).
Note that you can even enable DHCP on the management interface to assign IP address dynamically but this is not recommended. I always recommend static IPs on the MGT interface.
Related Posts
- Prevent Spoofing Attacks on Cisco ASA using RPF
- Configuring Connection Limits on Cisco ASA Firewalls – Protect from DoS
- Configuring AAA Authentication-Authorization-Accounting on Cisco ASA Firewall (TACACS+, RADIUS)
- How to Configure Access Control Lists on a Cisco ASA 5500/5500-X Firewall (with Examples)
- Cisco ASA Firewall Packet Tracer for Network Troubleshooting