One of the most useful troubleshooting features of Cisco ASA firewalls is to use the “packet-tracer” command to trace and simulate how a packet will traverse through the ASA appliance in order to identify possible problems (such as why a packet is blocked etc).
The packet tracing feature was introduced in Cisco ASA firewall version 7.2(1) and is still available up to now in the newer 9.x ASA images.
With this you can capture detailed packet information traversing the firewall for analysis and for troubleshooting connectivity problems.
Packet-Tracer Command Syntax
To run a packet tracing session for packet troubleshooting and network fault isolation, use the packet-tracer command as shown below:
packet-tracer input [src_int] protocol src_addr src_port dest_addr dest_port [detailed] [xml]
There are much more options in the command above, but I’m showing the most simple and most useful syntax (we will see also detailed examples below).
- [src_int]: Specify the source (ingress) interface from which the simulated packet will start.
- protocol: This can be “tcp” or “udp” or “icmp“.
- src_addr: Here enter a source IP address of the packet.
- src_port: Source port of the packet (can be any arbitrary number, preferably above 1024).
- dest_addr: Destination IP address of the packet.
- dest_port: Destination port of the packet.
- [detailed]: Provides detailed tracing output information.
- [xml]: Displays the trace results in XML format.
What is Packet Tracer on Cisco ASA
With the “packet-tracer” command it is possible to trace the lifespan of a packet through the security appliance to see if it is behaving as expected. The packet-tracer command lets you do the following:
- Debug all packet drops in production network.
- Verify the configuration is working as intended.
- Show all rules applicable to a packet along with the CLI lines which caused the rule addition.
- Show a time line of packet changes in a data path.
- Inject tracer packets into the data path.
The packet-tracer command provides detailed information about the packets and how they are processed by the security appliance.
In the instance that a command from the configuration did not cause the packet to drop, the packet-tracer command will provide information about the cause in an easily readable manner.
For example if a packet was dropped because of an invalid header validation, a message is displayed that says, “packet dropped due to bad ip header (reason).”
Moreover, if a packet is dropped because an Access Control List (ACL) blocked the packet, this will be shown in the output as well.
In summary, the packet-tracer command injects a non-real packet into the ASA firewall in order to track the flow of the packet through the appliance.
The packet passes through all the evaluation steps and enforcements that the firewall applies such as route-lookup, Access Control Lists, NAT, protocol inspections etc. in order to simulate real-world traffic flow.
Let’s now see some practical example of how to use this feature:
Practical Trace Examples
Example 1
To enable packet tracing from inside host 10.2.25.3 to external host 209.165.202.158 with detailed information, enter the following:
ASA# packet-tracer input inside tcp 10.2.25.3 1025 209.165.202.158 80 detailed
The command above will create a virtual TCP packet which will start from the “inside” interface and have source IP “10.2.25.3” and source port “1025” and destination IP “209.165.202.158” with destination port “80“.
The firewall will simulate the above packet flow and tell you exactly how the ASA firewall will behave in various steps of the packet flow (e.g packet ALLOWED, DROPPED etc).
Example 2
Here we will see an example using both the ASA CLI and the ASDM management GUI.
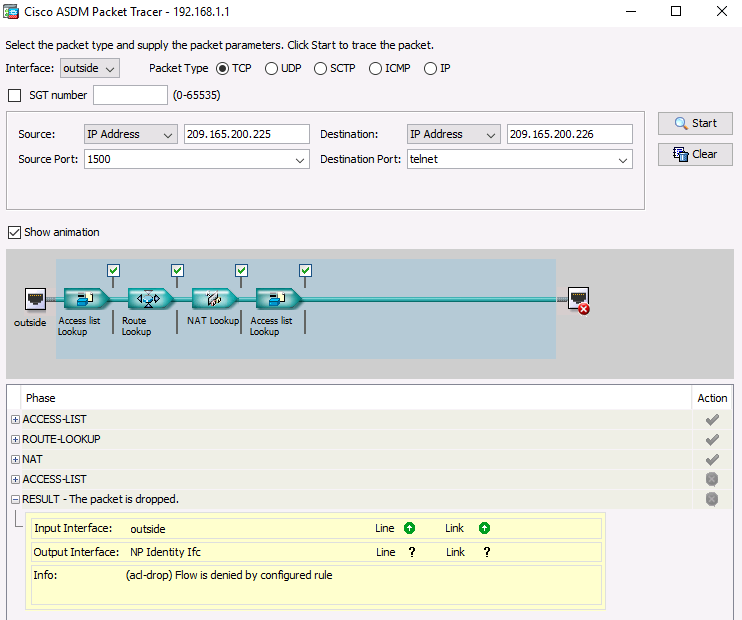
We will create a simulated packet traffic coming from the outside interface of the ASA (e.g Internet) and hitting the IP address of the ASA WAN interface (209.165.200.226).
CLI Example:
ASA# packet-tracer input outside tcp 209.165.200.225 1500 209.165.200.226 23
The above command will create a virtual tcp packet coming from the “outside” interface. This packet will have source IP 209.165.200.225 (source port 1500) and the destination IP will be 209.165.200.226 (destination port 23).
Because the above traffic flow is not permitted on the ASA (by the ACCESS-LIST), it will be dropped.
See also how to run this trace with the ASDM below.
ASDM Example:
Related Posts
- Prevent Spoofing Attacks on Cisco ASA using RPF
- Configuring Connection Limits on Cisco ASA Firewalls – Protect from DoS
- Configuring AAA Authentication-Authorization-Accounting on Cisco ASA Firewall (TACACS+, RADIUS)
- Cisco ASA Firewall Management Interface Configuration (with Example)
- How to Configure Access Control Lists on a Cisco ASA 5500/5500-X Firewall (with Examples)