Networks Training

  • About
  • My Books
  • IP Tools
  • HOME
  • Cisco Networking
    • Cisco General
    • Cisco IOS
    • Cisco VPN
    • Cisco Wireless
  • Cisco ASA
    • Cisco ASA General
    • Cisco ASA Firewall Configuration
  • Certifications Training
    • CCNA Training
    • Cisco Certifications
    • I.T Training
  • General
    • Tech News
    • General Networking
    • IP Telephony
    • Network Security
    • Product Reviews
    • Software
  • Cisco Routers
  • Cisco Switches
You are here: Home / Cisco ASA Firewall Configuration / Cisco ASA QoS for VoIP Traffic

Cisco ASA QoS for VoIP Traffic

Edited By Harris Andrea

One of the new additions in the Cisco ASA 7.x and 8.x software image is the ability to configure Quality of Service for VoIP traffic, something that was found only on IOS routers in the past. The ASA supports now Low Latency Queuing (LLQ priority queuing) which lets you prioritize certain traffic flows (such as latency-sensitive traffic like voice and video) ahead of other traffic.

In its simplest form, you just enable priority queuing on an interface and select with an ACL and a policy map which traffic should pass through the priority queue of the interface. All other traffic will be passing through the “best effort” queue. For example if we have FTP data traffic (which is usually a long packet) together with a VoIP packet, the VoIP will be served first by the interface (priority queue) while the FTP packet will be served in a best-effort basis.

In our example below, we present a usual scenario in which we have two (or more) sites communicating through a Lan-to-Lan IPSEC VPN via the Internet. Between the sites we can have both data and VoIP traffic communication. Although we can not enforce real QoS through the Internet, at least we can ensure voice traffic prioritization on the firewall interface.

MORE READING:  Configuring IPS Protection and IP Spoofing on Cisco ASA 5500 Firewalls

cisco asa qos for voip over a vpn

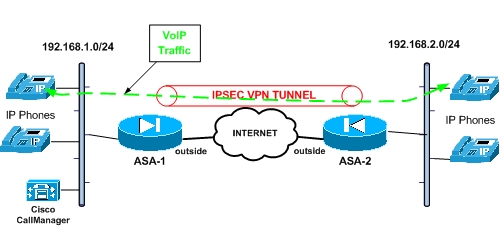
From the diagram above we assume that we have already configured the IPSEC VPN and is working properly (i.e both subnets 192.168.1.0/24 and 192.168.2.0/24 can communicate via the tunnel). The example configuration below is for the ASA-1 firewall and should be applied accordingly to ASA-2 for better QoS performance.

! Enable a priority queue on the outside interface

ASA-1(config)# priority-queue outside
ASA-1(config-priority-queue)# exit

! Select VoIP traffic for prioritization

ASA-1(config)#access-list VoIP-Traffic-OUT extended permit tcp 192.168.1.0 255.255.255.0 192.168.2.0 255.255.255.0 eq h323
ASA-1(config)#access-list VoIP-Traffic-OUT extended permit tcp 192.168.1.0 255.255.255.0 192.168.2.0 255.255.255.0 eq sip
ASA-1(config)#access-list VoIP-Traffic-OUT extended permit tcp 192.168.1.0 255.255.255.0 192.168.2.0 255.255.255.0 eq 2000

ASA-1(config)#access-list VoIP-Traffic-IN extended permit tcp 192.168.2.0 255.255.255.0 192.168.1.0 255.255.255.0 eq h323
ASA-1(config)#access-list VoIP-Traffic-IN extended permit tcp 192.168.2.0 255.255.255.0 192.168.1.0 255.255.255.0 eq sip
ASA-1(config)#access-list VoIP-Traffic-IN extended permit tcp 192.168.2.0 255.255.255.0 192.168.1.0 255.255.255.0 eq 2000

! Match the ACL and traffic with Expedited Forwarding (EF)

ASA-1(config)# class-map Voice-OUT
ASA-1(config-cmap)# match dscp ef
ASA-1(config-cmap)# match access-list VoIP-Traffic-OUT
ASA-1(config-cmap)# exit

MORE READING:  Cisco ASA ftp inspection purpose


ASA-1(config)#class-map Voice-IN
ASA-1(config-cmap)# match dscp ef
ASA-1(config-cmap)# match access-list VoIP-Traffic-IN
ASA-1(config-cmap)# exit

! Configure the actual policy that will be applied to the interface

ASA-1(config)# policy-map VoicePolicy
ASA-1(config-pmap)# class Voice-OUT
ASA-1(config-pmap-c)# priority
ASA-1(config-pmap-c)# exit

ASA-1(config-pmap)# class Voice-IN
ASA-1(config-pmap-c)# priority
ASA-1(config-pmap-c)# exit
ASA-1(config-pmap)# exit

! Apply the policy to the outside interface

ASA-1(config)# service-policy VoicePolicy interface outside

EDIT: A small correction here. Priority Queue will only apply to an interface in the “outbound” direction, so the Voice-IN class above will not have any effect in the policy-map. Also, as I stated at the beginning of the article above, the configuration shown in this post applies for ASA-1. The reciprocal configuration should be also applied on ASA-2 with the proper ACL which should match traffic from 192.168.2.0 to 192.168.1.0 network.

Spread the love

Related Posts

  • Prevent Spoofing Attacks on Cisco ASA using RPF
  • Configuring Connection Limits on Cisco ASA Firewalls – Protect from DoS
  • Configuring AAA Authentication-Authorization-Accounting on Cisco ASA Firewall (TACACS+, RADIUS)
  • Cisco ASA Firewall Management Interface Configuration (with Example)
  • How to Configure Access Control Lists on a Cisco ASA 5500/5500-X Firewall (with Examples)

Filed Under: Cisco ASA Firewall Configuration

Download Free Cisco Commands Cheat Sheets

Enter your Email below to Download our Free Cisco Commands Cheat Sheets for Routers, Switches and ASA Firewalls.

By subscribing to our email list you will be receiving technical tutorials and industry news from time-to-time. You can unsubscribe at any time.

About Harris Andrea

Harris Andrea is an Engineer with more than two decades of professional experience in the fields of TCP/IP Networks, Information Security and I.T. Over the years he has acquired several professional certifications such as CCNA, CCNP, CEH, ECSA etc.

He is a self-published author of two books ("Cisco ASA Firewall Fundamentals" and "Cisco VPN Configuration Guide") which are available at Amazon and on this website as well.

Comments

  1. Wesley says

    May 18, 2009 at 11:40 am

    ASA-1(config)# class-map Voice-OUT
    ASA-1(config-cmap)# match dscp ef
    ASA-1(config-cmap)# match access-list VoIP-Traffic-OUT

    I cannot add these 2 matches. Can you help me?

  2. BlogAdmin says

    May 19, 2009 at 9:22 am

    First of all, for the access list match you must create the ACL first and then use it in the match statement of the class-map. For the dscp value match, this should work just as I show in the example. If you still have problems for matching the dscp value, just leave the ACL match only.

    Cheers
    Harris

  3. fkento says

    November 8, 2009 at 5:58 pm

    I too am having the same problem as Wesley. When I try to add the second match, I get this

    ERROR: Multiple match commands are not supported except for the ‘match tunnel-group or default-inspect-traffic’ command.

    This seems to imply that you cannot have two match statements in a class-map. If that is true, how do you match traffic with Express Forwarding and the ACL?

    Thanks for your help!

  4. BlogAdmin says

    November 9, 2009 at 2:20 am

    Well guys the firewall I tested the above configuration on did not give me an error message. Maybe it depends on the software version. Anyway, my opinion is to forget about matching the DSCP EF value and use only the ACL matching. Since the ACL is very specific (i.e you match specific traffic with specific ports, h323,sip,2000) then you can be assured that you are only prioritizing voice traffic and nothing else. Also, matching on the DSCP value might not be a very reliable match since you depend on the voice source device which must set the DSCP value of the voice packets to EF.

  5. fkento says

    November 19, 2009 at 10:36 am

    First of all, thanks for the great information on your site. It is very helpful. However, I just want to point out that I was having problems getting priority queuing to work so I called Cisco and they said priority queuing will not work unless you also implement traffic policing or shaping. Here is a good article that discusses both. http://tinyurl.com/yed7e6l

    Also, your access list only matches tcp traffic and most VoIP traffic is udp so you’re probably not matching any packets with the current ACL. I changed mine to udp and it’s working now.

    Thanks
    Kent

  6. BlogAdmin says

    November 19, 2009 at 2:00 pm

    fkento

    Thanks for the comment. Usually the signaling control protocols (H323, SIP, and SCCP) use TCP ports for communication. H323 uses TCP 1720, SIP uses TCP port 5060 and the Cisco SCCP protocol uses TCP 2000. Sometimes I have seen devices using UDP also so yes you might be right that UDP should be configured also on the ACL in addition to TCP. For payload voice traffic, this is definitely UDP (Real Time Protocol-RTP).

    Cheers

  7. Cisco says

    December 28, 2010 at 5:26 pm

    Priority queue will only apply to an interface in “outbound” direction.

    In your example above. Please indicate ASA-2 outside interface with a priority queue applied to it’s outside interface matching traffic going from 192.168.2.0/24 to 192.168.1.0/24

  8. Devin says

    May 16, 2013 at 3:03 pm

    Does this also include RTP Real-time transport protocol traffic? Reason I ask is because once I establish a call, phone at site-A connected to phone at site-B will be using RTP. Sorry I am new to QoS LLQ so trying to understand.

  9. Blog Admin says

    May 16, 2013 at 5:00 pm

    Devin,

    Yes sure. If RTP traffic is tagged as EF (expedited forwarding) then it will go in the priority queue. The EF tag must be applied by the device generating the RTP traffic (e.g IP phone)

  10. Devin says

    May 16, 2013 at 11:50 pm

    I nornally configure my Cisco voice switches with the “auto qos voip cisco-phone” and my trunk ports with “auto qos voip trust”. How to confirm EF is tagged?

  11. Blog Admin says

    May 17, 2013 at 4:26 am

    you should be ok

  12. Devin says

    May 24, 2013 at 1:04 pm

    When a phone makes an outbound call out a PRI on the CME router what protocol is being used between the phone and CME? This should be skinny(SCCP) correct?

  13. Blog Admin says

    May 24, 2013 at 7:12 pm

    Devin,

    The communication between an IP Phone and CME is either skinny (SCCP port 2000) or can be SIP if the phone has a SIP firmware.

  14. Maz says

    March 29, 2016 at 4:17 pm

    Hi

    I have been given task to setup new subnets in my office? Currently the inside network configure on 192.168.1.0/24.

    Now the requirement is to create new subnets:

    Label 802.1Q Tag Prefix Gateway
    Data Network 1608(1) 10.176.4.0/24 10.176.4.1
    Voice Network 1508 10.176.5.0/24 10.176.5.1

    Can you please advised how this can be achieved?

    Our hardware is:
    Hardware: ASA5512, 4096 MB RAM, CPU Clarkdale 2793 MHz, 1 CPU (2 cores)
    ASA: 2048 MB RAM, 1 CPU (1 core)
    Cisco Adaptive Security Appliance Software Version 9.1(2)
    Device Manager Version 7.1(3)

  15. Harris Andrea says

    March 30, 2016 at 4:12 pm

    Hi Maz,

    You should connect one physical port of the ASA to a trunk port on a switch. Then configure subinterfaces on the ASA and also vlans on the switch for the two subnets.

    Harris

  16. Maz says

    March 30, 2016 at 5:14 pm

    Hi

    Can I make virtual subnets as DHCP server on the ASA for voice and data VLAN ?

    How will client obtain correct IP from the switch?

    Does it need to be dedicated switched port for PCs and VOIP phones or is there a way to connect using any ports?

    Thanks
    Maz

  17. Harris Andrea says

    March 31, 2016 at 4:51 am

    Yes, you can configure two DHCP scopes on the Cisco ASA to assign IP addresses to the two VLANs (see link below)

    https://supportforums.cisco.com/discussion/11139261/using-asa-dhcp-server-multiple-vlans

    The switch ports must be access ports for PCs and VOIP

    Harris

  18. Maz says

    March 31, 2016 at 6:00 am

    Hi

    Looks like there is an option to configure switch as trunk ports and use the switchport of back of voip phone connect to PC. If I go with this option, Do I have to make all ports on the switch as trunk where I connect the voip phones?

    http://docwiki.cisco.com/wiki/Sample_configuration_for_Voice_and_Data_deployment_on_a_Switch

    Many thanks
    Maz

  19. Maz says

    March 31, 2016 at 9:16 pm

    Hi Harris

    I have managed to figure out the switching part. Now the challenge is to Dynamic PAT Two sub interfaces to one ISP IP for Internet access. Is there way to do this. Tried via ASDM but it let me only select one source interface when NATing. Is it doable on my ASA version? If so please provide any links to do via ASDM and CLI.

    Software Version 9.1(2)
    Device Manager Version 7.1(3)

    Thanks
    Maz

  20. Harris Andrea says

    April 1, 2016 at 5:11 pm

    Yes that’s definitely doable. Check how you do it with one source LAN and then do the same for the second LAN as well.(sorry I don’t have time to provide links etc).

  21. Maz says

    April 1, 2016 at 11:17 pm

    It worked :)

    Thanks for your help.

Leave a Reply

Your email address will not be published. Required fields are marked *

This site uses Akismet to reduce spam. Learn how your comment data is processed.

Search this site

About Networks Training

We Provide Technical Tutorials and Configuration Examples about TCP/IP Networks with focus on Cisco Products and Technologies. This blog entails my own thoughts and ideas, which may not represent the thoughts of Cisco Systems Inc. This blog is NOT affiliated or endorsed by Cisco Systems Inc. All product names, logos and artwork are copyrights/trademarks of their respective owners.

Amazon Disclosure

As an Amazon Associate I earn from qualifying purchases.
Amazon and the Amazon logo are trademarks of Amazon.com, Inc. or its affiliates.

Search

BLOGROLL

Tech21Century
Firewall.cx

Copyright © 2026 | Privacy Policy | Terms and Conditions | Contact | Amazon Disclaimer | Delivery Policy