In this tutorial we will describe how to setup a Cisco Meraki WiFi Access Point (AP) together with several other useful details, so let’s get started.
A Meraki access point is different to a Cisco AireOS Access point because it doesn’t need a separate Wireless LAN Controller or an embedded controller such as Mobility Express to work.
The controller for a Meraki Access Point is in the cloud in a Meraki Datacenter and is accessed via a web-based GUI dashboard.
This single Meraki dashboard is used to monitor and configure all the Meraki devices present in a network such as Access Points, Security Appliances, Switches and Cameras or IOT devices such as sensors.
Being a cloud-based application means that the Meraki dashboard can be accessed by any device which has access to a standard web browser and the internet.
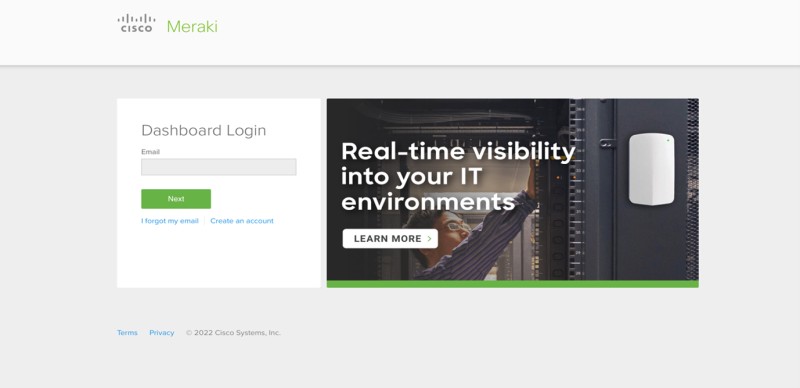
Simply enter the address https://dashboard.meraki.com into the URL bar and the login page for the Meraki dashboard will appear.
Let’s now explain how to setup the AP device:
Steps for Setting Up Cisco Meraki AP
1) Creating a dashboard Account
A dashboard account will need to be created before you can setup and manage your Meraki Access Point or other Meraki device.
Click create an account and complete the web form with your name, a new login password and company details.
You will then receive a verification email to the address that was entered into the webform and once verified you will be able to login to the dashboard.
For increased security it is possible and recommended to setup 2FA using Google Authenticator from the accounts tab at the top right of the dashboard.
2) Adding your network to the dashboard
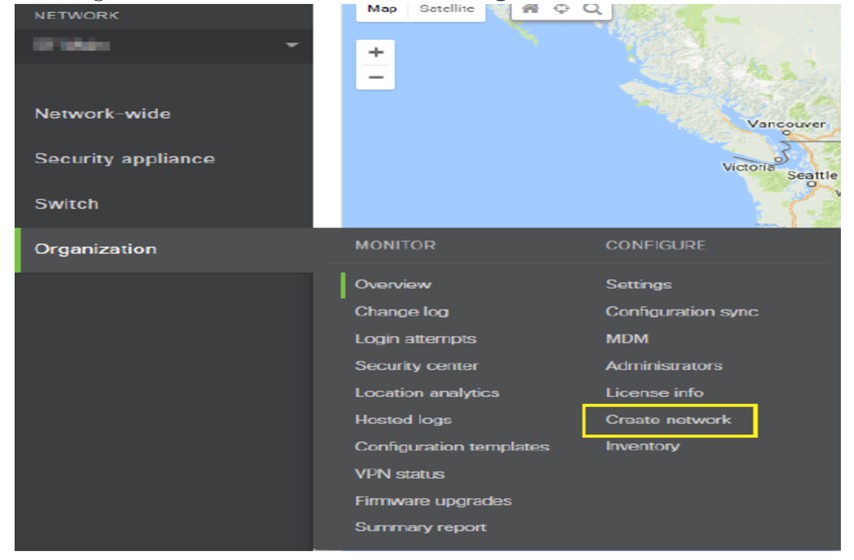
The next step will be to add the network you want to manage into the dashboard. From the menu on the left of the screen, go to Organization and select create network.
Next enter a descriptive name of the network such as Head Quarters or Branch Office etc.
You will then be asked what type of network this is, meaning what kind of devices are going to be operating in this network.
For this option you can either break you network up into device groups by just selecting Access Points and then creating another network for switches and so on.
You can also select combined Hardware, and this will show a mixture of devices within this network.
If the network is small then select combined, if it’s a large network with hundreds of devices then performance of the dashboard will be better if you create a different network for each device group.
3) Adding Devices to the Inventory
Before any device can be seen and configured in the dashboard, it first needs to be added to the organisation’s inventory.
This is known as ‘Claiming’ a device. To claim a device, select organization from the left-hand menu and then select Inventory from the Configure menu.
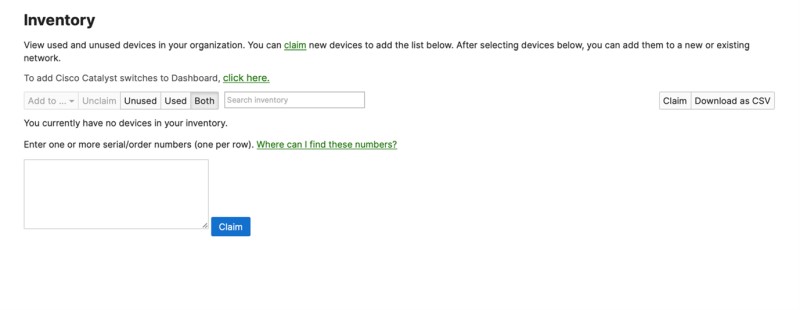
Devices are added to the inventory by entering the serial number of the device which can be found on the side of the box that the device is packaged in.
If you are configuring many devices then it is easier to copy all the serial numbers into a notepad, one number per row and then copy and paste them all into the box at the same time. Click claim and all the devices will be added into the inventory.
Once the Access Point is added into the inventory you can then choose to add it to a new network or an existing network.
At this point the Meraki AP has been successfully added to the Meraki dashboard and the Wireless Network can be configured fully but the AP will not be accessible or configurable until its physically connected to the network and has internet connectivity so that it can communicate with the Meraki Cloud.
All the settings can be completed in advance from within the dashboard before the access point is connected to the network and once it has internet connectivity the pre-configuration will be pushed from the cloud and updated on the Access Point.
This is one of the advantages of a cloud-based controller because configuration templates can be completed in advance and the onsite engineer simply needs to plug in the device to the network and all the configurations will be loaded without any further intervention from the engineer.
Physical Connection of a Meraki Access Point to the Network
A Meraki Access Point is connected to the network by an ethernet RJ45 cable and is powered by POE+ via a POE compatible switch.
Once powered on the AP will need an IP address and internet connectivity to be able to communicate with the Meraki Cloud dashboard and obtain its configuration.
By default, the AP will use DHCP to try and obtain an IP Address from the network. In some situations, it may not be possible for the AP to receive its IP address by DHCP and a static IP address and IP Gateway will need to be manually applied to the Access Point through its ‘local status page’.
Manually setting an IP Address and Gateway to a Meraki Access Point
To manually assign an IP configuration to a Meraki Access Point a host computer will need to connect to the Access point through a web browser.
The host computer and Access Point both need to be connected, preferably to the same switch and both need to be assigned the same Vlan.
The Meraki AP will also beacon a default SSID named ‘Meraki Setup’ which will allow a wireless connection to the AP.
In the web browser of the host computer type http://ap.meraki.com and the local page from the access point will appear.
To login to this page enter the serial number of the Access Point in the username box and leave the password box blank.
Select Configure from the top menu bar and the following screen will appear:
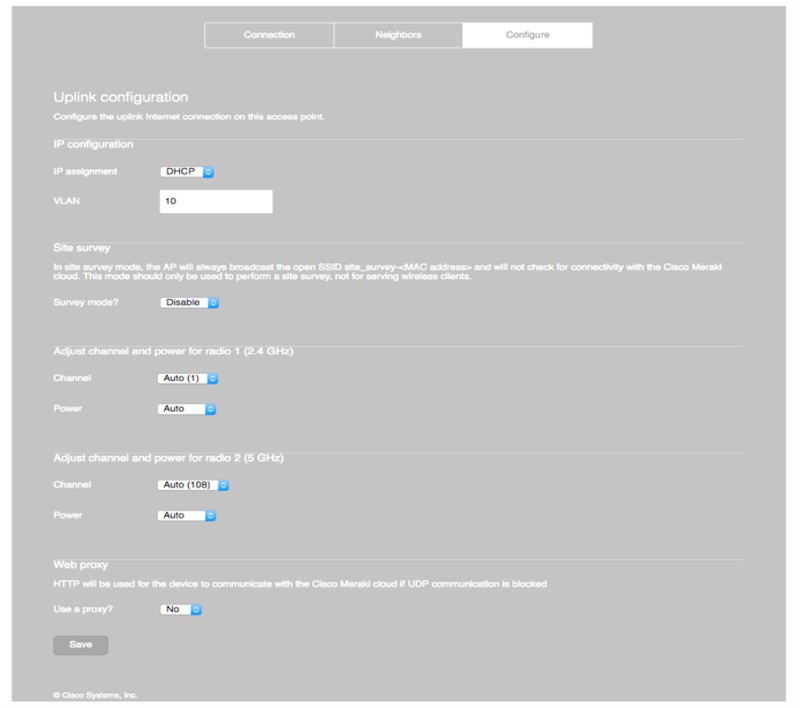
Select the drop-down menu for IP assignment and change this from DHCP to Static. Enter the desired static IP address, subnet mask and gateway address and then click save at the bottom of the menu.
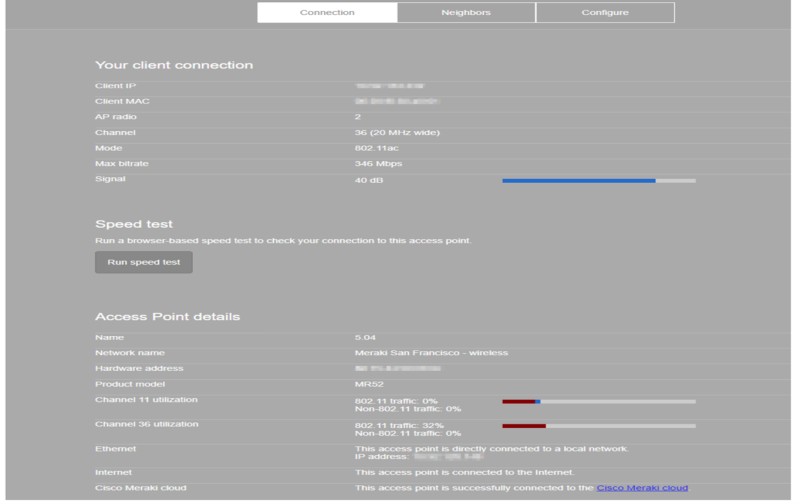
Select connection from the top menu to go back to the first page and under the section access point details you should see the AP is successfully connected to the internet and the Meraki cloud services. See Screenshot below:

Now that the AP is connected to the internet it will first download the latest software. The LED will turn blue, and installation of the new firmware will start.
Once the software upgrade has completed the AP will check in to the Meraki dashboard and the LED will turn Green.
The Access Point configuration will then be downloaded and applied. If the LED stays orange this means that the AP is still waiting to check in to the Meraki cloud and you should check to ensure that there are no firewall rules upstream from the device which might be blocking connectivity to the Meraki cloud.
On the firewall Allow access to 209.206.48.0/20 and the following ports:
- HTTPS port 443
- TCP port 7734
- UDP 7351
Meraki AP LED Status Lights and Dark mode
- Orange – AP is booting (permanent Orange suggests hardware issue)
- Rainbow – AP is initializing/scanning
- Blinking Blue – AP is upgrading
- Green – AP in Gateway mode with no clients
- Blue – AP in Gateway mode with clients
- Blinking Orange – AP can’t find uplink
- Dark mode is configured from the Meraki Dashboard and disables the LED for security where required.
How Far the Signal from Meraki AP Travels?
There are many factors which determine how far a signal from an access point will travel. These factors include:
- The transmit power of the Access Point
- The sensitivity of the AP Antennas
- What obstacles are between the access point and the client device such as walls, glass, doors etc.
- The transmit and receive power of the client device
- Any non-wifi RF noise such as machinery and microwaves operating in the vicinity of the AP.
- Any RF interference such as nearby AP’s transmitting on the same channel as the AP.
Meraki access points equipped with omnidirectional antennas typically reach a range of 100 meters.
Wireless Survey – How Much Area is Covered?
The only way to determine exactly what distance and area a useable signal from an AP is travelling, is to perform a wireless survey using a specialist tool.
Ekahau and Netscout are two examples of software which are used to carry out wireless surveys.
These surveys will produce heatmaps to show the strength of the signal received by the survey device at various locations.
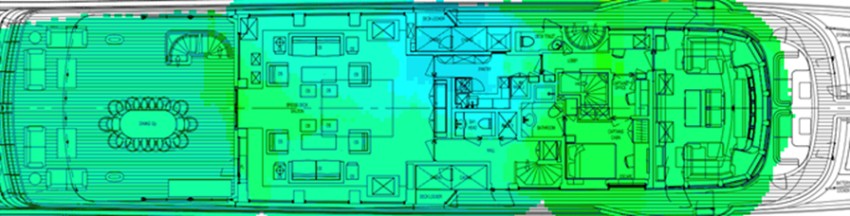
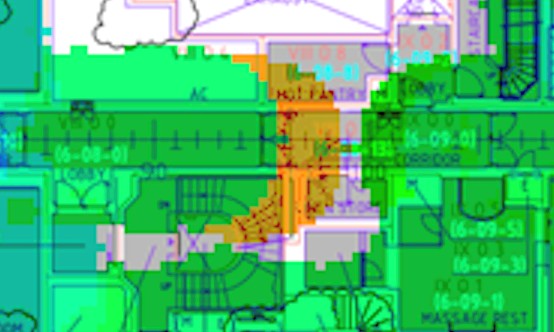
The heatmap below shows the results from a passive survey which was carried out on a yacht.
The blue and green colours show areas that have good signal coverage below -69db.
Areas which are coloured yellow have a weak signal above -69db and an area which is orange has no usable signal or is above -90db.
A passive survey is carried out when there are already access points installed at a site and the Engineer wants to know what coverage there is from these existing access points and to detect any rogue devices or sources of interference which could be affecting the Radio Frequency (RF) performance.
An AP on a stick survey is carried out for a new installation of access points, usually at a site which has no wireless infrastructure and is known as a Greenfield site.
Meraki Survey Mode
Meraki Access points have a feature called Survey Mode which helps an Engineer to carry out an AP on a stick survey.
When placed into survey mode the Meraki access point broadcasts a survey SSID on both the 2.4Ghz and 5Ghz radio frequencies and does not require connectivity to the Meraki Cloud because it will not be connected to a network and serving clients.
The survey mode only allows the survey laptop and software to see the RF transmissions for the purpose of measuring the coverage area of the Access Point.
To carry out the survey the Meraki AP is mounted onto a tripod and powered by a portable battery pack.
The tripod is placed in the location where the Engineer wants to place an access point. The Engineer then walks around the site with the survey laptop taking regular measurements of the received RF signal from the Meraki AP that is in Survey Mode.
Once all the areas have been surveyed the software produces the heatmap which depending on the type of AP used (directional or Omnidirectional) will be a circle with blue in the middle changing to green and then yellow as the circle expands and then to orange in the areas where the laptop could no longer receive the signal from the survey AP.
The Engineer then moves the tripod to the next planned AP location and carries out the survey again.
This is repeated until each planned Access Point has been mapped and when the data is merged the Engineer can see any coverage gaps in the design.
This allows the planned locations to be moved or more APs added to the design to ensure full coverage once the new Access Points are installed.
To place a Meraki AP into survey mode, log in to the Access Points local page and click on the configuration tab.
On the configuration page there is a section titled site survey. Set the drop-down menu from disable to enable and the device will reload and broadcast the survey SSID.
Types of Antennas for Meraki Access Points
There are several different antenna types for Meraki.
Here are some examples:
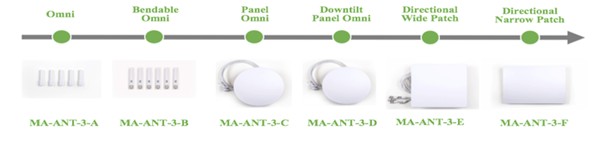
The following are 6 types of Antennas Available for outdoor Meraki Access Points which have External Connectors.
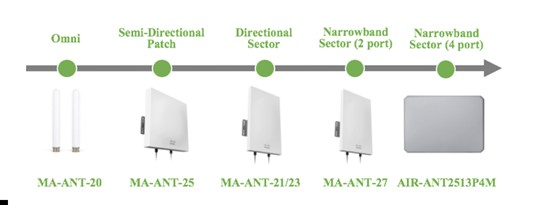
The following are 4 types of Antenna Available for indoor Meraki Access Points which have External Connectors.
Meraki Access Point Licensing
Connection to the Meraki Cloud requires a license which can be purchased from an authorized Meraki Partner or Reseller.
There are two licensing models which Meraki use. The first is per-device, per year basis and the second is co-termination (co-term).
Organizations are set up as co-term by default which means that all devices have a single license expiration date.
If the license expires and is not renewed all unlicensed devices will stop working and will not pass traffic or be configurable.
Some Capabilities and Features of Meraki APs
Meraki Access Points feature industry-leading technology aimed at demanding Enterprise environments with all the latest indoor and outdoor models supporting WIFI 6 and WIFI- 6E technology. The main features of a Meraki Access Point are:
- Self-configuring, plug-and-play deployment
- 11ax MU-MIMO with up to eight spatial streams
- Integrated enterprise security and guest access with built in BYOD
- Dedicated radio for security and RF optimization with integrated spectrum analysis (indoor models)
- Integrated intrusion detection and prevention system (WIDS/WIPS)
- Self-learning application-aware traffic analytics engine
- Flexible group policy engine for creating and applying application- aware policies by network, device-type, and end user
- Integrated Bluetooth® IoT radio
- Self-healing, zero-configuration mesh
- Role-based administration and automatic, scheduled firmware upgrades delivered over the web
- E-mail and text message alerts upon power loss, downtime, or configuration changes