What is WPA2:
WPA2 is short for Wi-Fi Protected Access 2 and is standardized under the IEEE 802.11i standard. WPA2 is a security protocol framework that is used to protect wireless networks.
WPA2 is currently considered as the most secure method to protect a Wi-Fi network. It provides layer 2 based security and uses IEEE 802.1x port based authentication protocol.
EDIT: The newest WPA3 is currently the most secure protocol for WLAN protection.
Compared to the older Wi-Fi security standards, WPA2 is much more secure than WPA and WEP because it uses the much stronger Advanced Encryption Standard (AES) together with some other key exchange, authentication and ciphering algorithms.
For example, WPA2 creates new session keys on every association. The encryption keys that are used for each client on the network are unique and specific to that client. This means that every packet that is sent over the air is encrypted with a unique key.
WPA2 Modes of Operation:
WPA2 supports two modes of operation depending on the environment which is implemented and the level of security you want to provide. These are WPA2 Personal and WPA2 Enterprise.
WPA2 Personal : A pre-shared key is used to authenticate clients on the WLAN and this is the most applicable mode for home use or for small WiFi networks. This is still very secure provided that the pre-shared key remains strictly private within the users of the WiFi network and also provided that the key has sufficient length more than 8-10 characters including alphanumeric and special characters.
WPA2 Enterprise : This is the most secure mode of operation and – as the name suggests – it is mostly used in Enterprise networks. An 802.1x EAP-based authentication method must be used to authenticate the clients.
You need an External RADIUS server in order to configure WPA2 Enterprise. Moreover, if you use the widely used EAP-PEAP authentication protocol, you will need to install a trusted Digital Certificate on the RADIUS server.
A very common scenario with Enterprises that have a Microsoft Active Directory server installed, is to integrate the RADIUS server with the Microsoft AD in order to provide user authentication via the AD user directory.
Next we will see how to Configure WPA2 Personal and WPA2 Enterprise on a Cisco WLAN Controller and also directly on Access Point devices.
Configuring WPA2 Personal on Cisco 5508 Wireless LAN Controller:
See the screenshots and steps below for the configurations:
- Connect your PC on the network where controller has been set up.
- Access controller’s GUI with its management IP address.
- Navigate to WLANs tab and select Create New or select the existing WLAN id to edit.
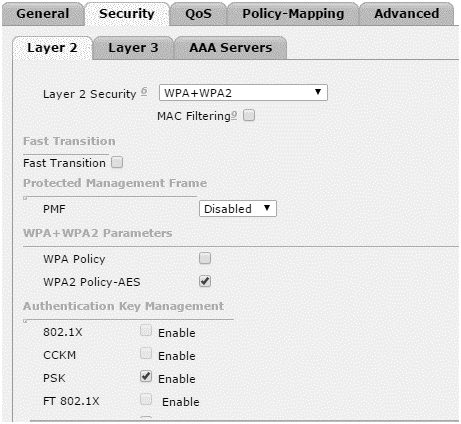
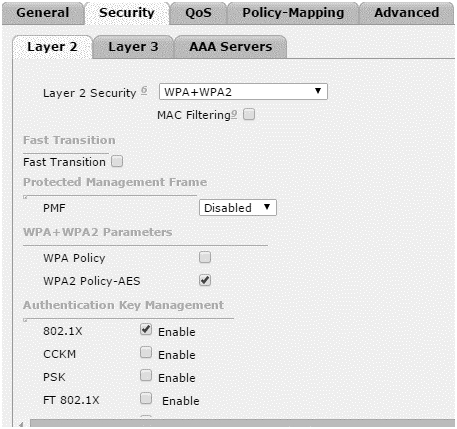
- Select the Security > layer 2
- In the layer 2 Security drop-down menu select WPA+WPA2.
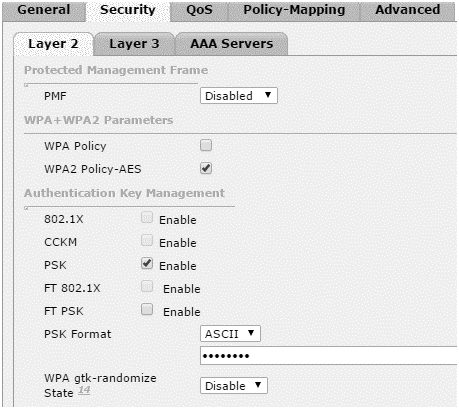
- In the WPA+WPA2 Parameters section enable the WPA2 Policy-AES.
- Under Authentication Key Management Section, enable PSK for WPA2 personal mode.
- Select PSK Format either ASCII or HEX and enter the desired pre-shared key.
This will use a pre-shared key to authenticate the wireless clients on that WLAN.
Configuring WPA2 Enterprise on Cisco 5508 Wireless LAN Controller:
To configure WPA2 Enterprise mode you need a RADIUS server for external authentication. The WLC needs to be configured in order to forward the user credentials to an external RADIUS server. The external RADIUS server then validates the user credentials and provides access to the wireless clients. The RADIUS server also needs to be configured for WLC.
Follow the steps below to configure the WLC for an external RADIUS server:
- ChooseSecurity > RADIUS Authentication from the controller GUI.
- Click Newin order to define a RADIUS server.
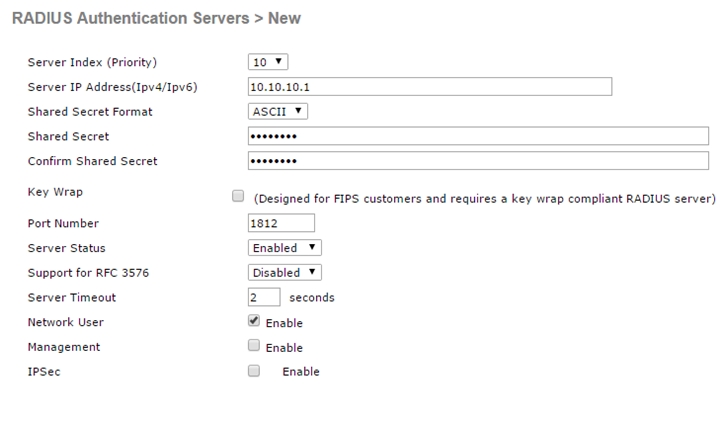
- Define the RADIUS server parameters on theRADIUS Authentication Servers > New as shown below.
In the figure, WLC is being configured for a new RADIUS server. Enter the IP address and the shared key (defined in the RADIUS server) that the controller will use to communicate with the server.
Default port number is 1812. The server status should be Enabled. To authenticate wireless clients, check the box next to Network User. Click apply button on the top right corner to apply the new settings.
Next we need to enable 802.1x authentication on the WLAN.
- Navigate to WLANs and select a new or existing WLAN to edit.
- Under Security > Layer2 tab, select WPA+WPA2 from drop-down menu.
- Check WPA2 Policy-AES
- Select 802.1x box under the Authentication Key Management.
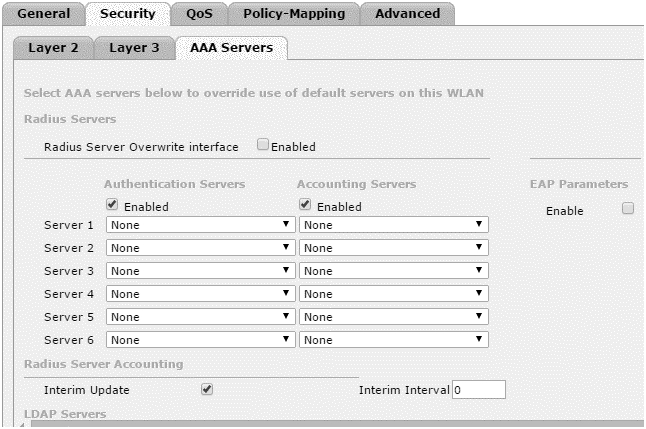
Next we need to configure RADIUS server for the selected WLAN
- Select Security > AAA server.
- Select the RADIUS server from the drop-down menu for Authentication Services and Accounting Services.
- Click apply button to make your configuration changes operational.
Configuring WPA2 Personal on Autonomous Access Point:
I’m using Cisco Aironet 1252 for this tutorial. See the steps and screenshots below to see how to configure WPA2 Personal on a Cisco Autonomous AP.
- Connect access point to your PC with a console cable.
- Set IP address and subnet mask on interface BVI1.
- Configure IP address on your PC in the same subnet the access point is.
- Enter IP address of the access point in the browser to access the GUI of the access point.
- Enter username and password (Cisco, Cisco by default).
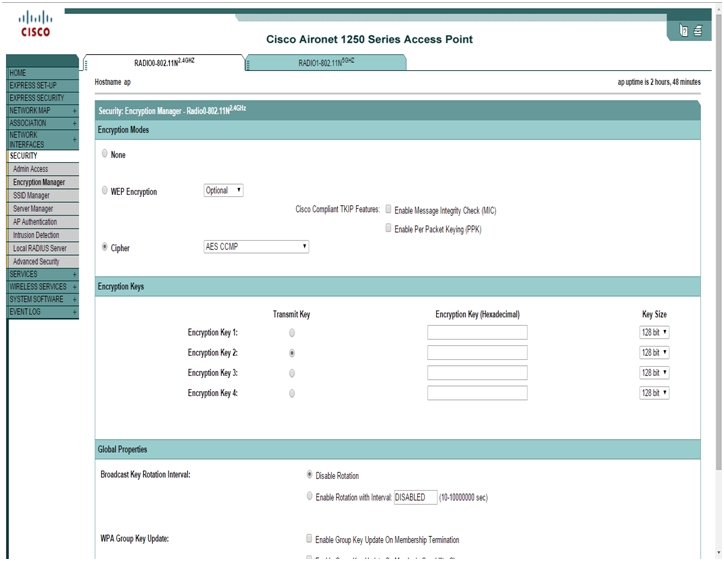
- Click on Security > Encryption Manager.
- Check Cipher and select AES CCMP from the drop down menu.
- Click Apply.
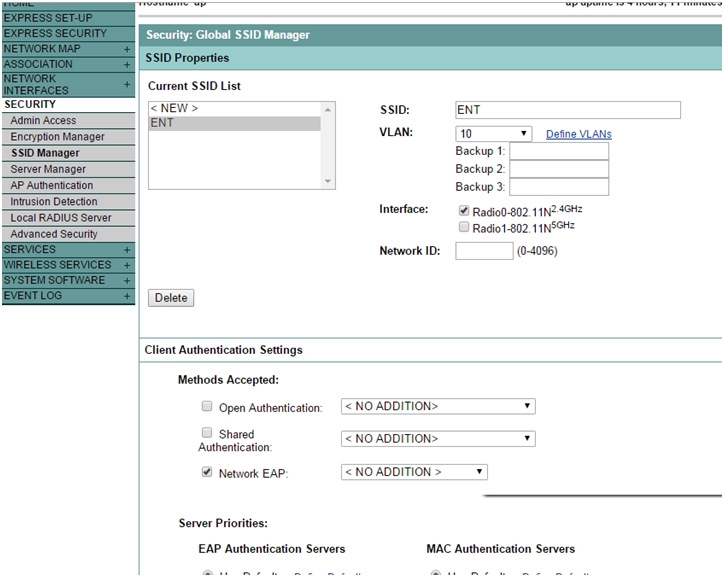
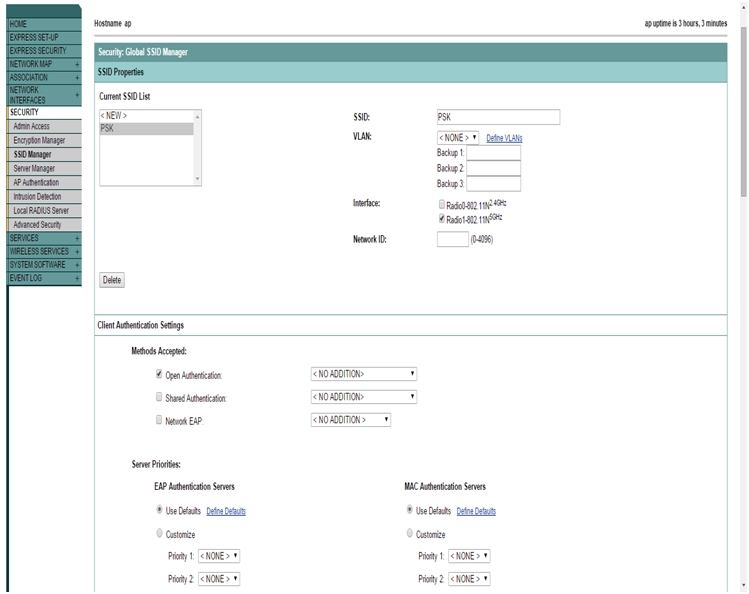
- Select Security > SSID manager from the left menu.
- Enter SSID name.
- Check Open Authentication box under the Client Authentication Settings.
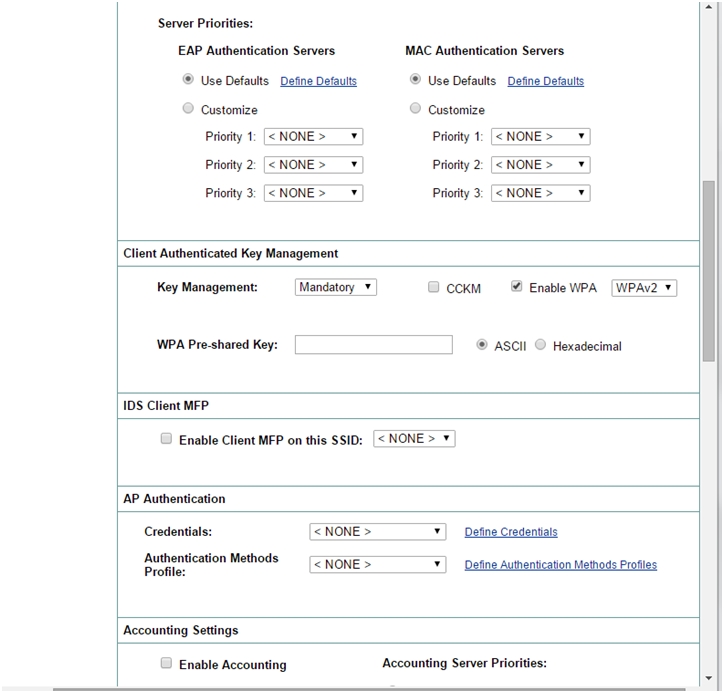
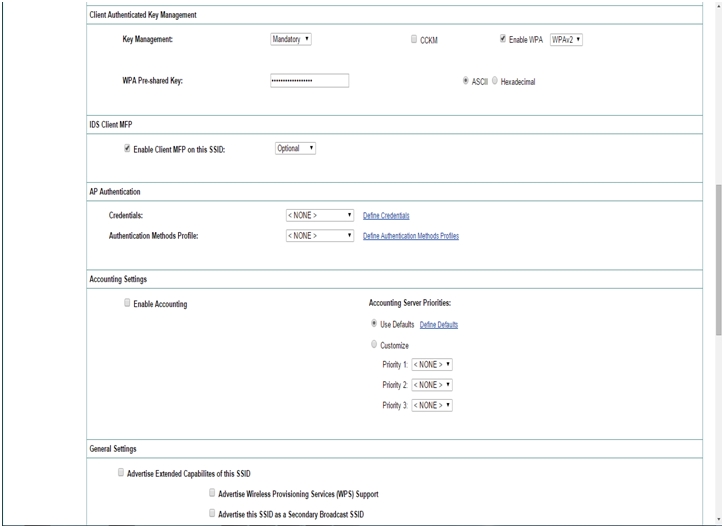
- Scroll Down and choose Mandatory for Key management and check WPA box and select WPA2.
- Enter the desired WPA Pre-shared Key. (Either ASCII or Hexadecimal).
- Click Apply.

Configuring WPA2 Enterprise on Autonomous Access Point:
I’m using Cisco Aironet 1252 for this tutorial. See the steps and screenshots below to see how to configure WPA2 Enterprise on a Cisco Autonomous AP.
If you don’t have an external Radius Server, you can configure an access point as local radius server.
- Access the GUI of the access point from your computer as you did in the last topic.
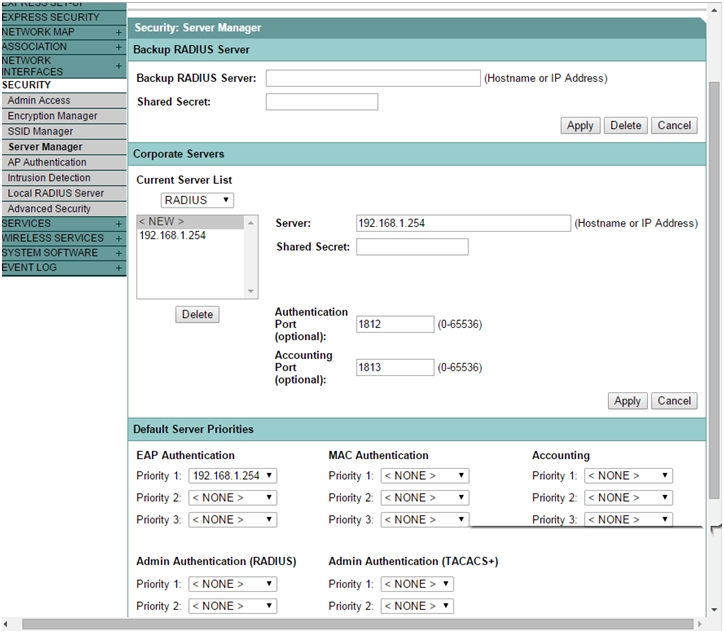
- Select Security > Server Manager from the left menu.
- Under Corporate Servers, enter the IP address of the AP to configure it as a local Radius Server or better to configure an external RADIUS such as Cisco ACS.
- Enter the Shared Secret.
- Use 1812 and 1813 for Authentication Port and Accounting Port and click Apply.
- In the Default Server Priorities, select EAP authentication Priority as the IP address of the server from the drop down menu and click Apply.
- Select Security > Encryption Manager in the left menu.
- From the Cipher drop down select AES CCMP. Click
- Select Security > SSID manager from the left menu.
- Create a new SSID to use WPA2 enterprise.
- In Client Authentication Settings, select Network EAP check box.
- Scroll Down. In Client Authenticated Key Management, choose Mandatory for Key Management and Enable WPA and select WPAv2 from the drop down menu. Click
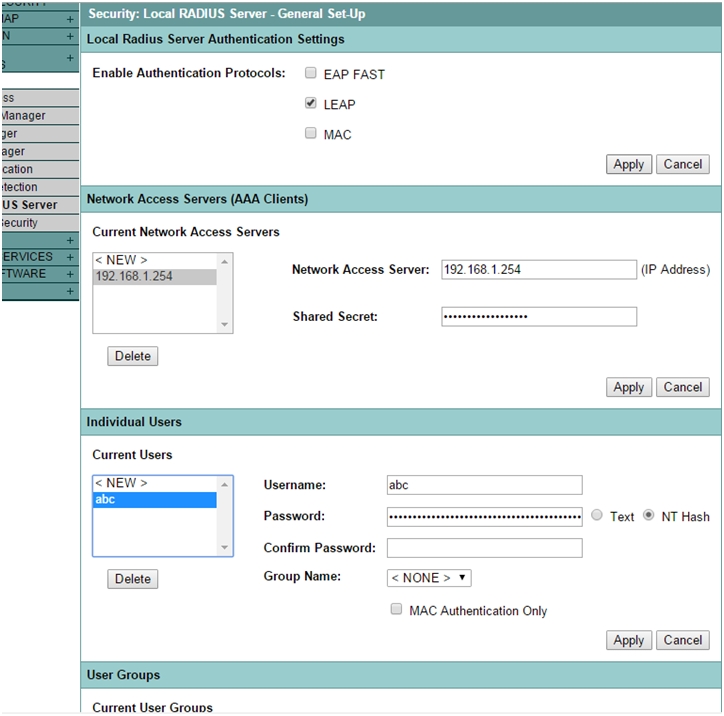
- Select Security > Local Radius Server > General Set-up.
- Under Local Radius Server Authentication Settings Check Leap for Enable Authentication Protocol. Click Apply.
- Under Network Access Servers, Enter ip address of the local server and shared secret. Click Apply.
- Scroll Down, under Individual Users, Define user’s credentials to authenticate with the local server.